Showing posts sorted by relevance for query "In the Kitchen:". Sort by date Show all posts

Tuesday, July 6, 2010

In the Kitchen: Mozzarella Stuffed Chicken with Pasta Croquettes and Tiramisu Cupcakes


I'm sure there is a proper way to pound meat, and a proper tool for doing such. But, as with all things in life, if you don't have what you need, improvise. In this house that means a big rubber mallet. Did it get the job done? You bet. Was it perfect? Not even close. But in addition to an impressive meal, I also got a workout.

Now this meal requires some serious patience in the kitchen, and if you have anything less than an over abundance, don't even attempt a single part of it. But if you're feeling frisky, then go or it — and revel in the beautiful bounty you have created. Read on for all the yummy details and find printable recipe cards at the end of the post.

· · · · · · · · · · · · · · · · · · · · · · · · · · · · · · · · · · · · · · · · · · · · ·

MOZZARELLA STUFFED CHICKEN

Ingredients
6 boneless skinless chicken breast halves
1/4 cup shallots, finely chopped
1 clove garlic, minced
6 oz frozen spinach, thawed and well drained
1 cup (4 oz) shredded mozzarella cheese
4 Tbsp pine nuts, toasted
1/4 cup seasoned fine bread crumbs
1/4 cup grated parmesan cheese
1 Tbsp olive oil


To toast the pine nuts, place them in a dry skillet over medium high heat and cook until they start to brown and become fragrant.


If you've never used a shallot, it's kind of like an onion that looks like a big purple bulb of garlic. You can find them in the produce section of your market near the onions or garlic. Peel off the skin, just like you would garlic, and chop em up.

To make the filling, saute the shallot and garlic in a skillet with some olive oil until tender. Remove from heat and stir in the spinach, mozzarella and pine nuts. Set aside.


And now we pound the meat. As I mentioned, I'm sure there are better tools to do this that a rubber mallet, but it gets the job done. I placed the breast, one at a time, in a gallon zip loc bag and pounded, pushing out a bit, until the breast was about 1/8 thick.

Once all the breasts are flattened, season with salt and pepper if desired. Working one at a time, spoon about 2-3 Tbsp of filling in the center.


Fold in one of the short sides, then the two long sides (as shown in the upper left photo above). Starting at the folded short end, roll the chicken, keeping the sides tucked in, towards the unfolded end and secure with toothpicks.

Brush each rolled breast with olive oil.


Mix the breadcrumbs and parmesan cheese in a bowl and roll each breast until coated. Place seam side down in a shallow baking dish and bake at 400° for about 25 minutes until chicken is tender and no longer pink.


Remove the toothpicks before serving. They may be a little hard to pull out, so feel free to utilize more tools (like a pair of pliers) if needed :)

If you'd like a crispier breading, saute the crumb coated breasts in a skillet with a little oil until browned before baking. These are delicious served as is or you can top with a little marinara or white sauce.


· · · · · · · · · · · · · · · · · · · · · · · · · · · · · · · · · · · · · · · · · · · · ·

PASTA CROQUETTES


Ingredients
8 oz egg noodles
6 Tbsp butter
3 Tbsp green onions, chopped
6 Tbsp flour
1/2 tsp salt
1/4 tsp pepper
1/4 tsp ground nutmeg (fresh is best!)
2 cups milk
3/4 cup fresh grated parmesan cheese
1 egg, beaten

For breading
Flour
2 eggs beaten with 2 Tbsp water
Panko bread crumbs
Oil for frying


Prepare the noodles according to package directions and drain well. Even though my package of noodles said 'wide', I wouldn't consider them wide. They are about the size of fettucini and flat - these will work best.

To make the sauce, melt the butter in a medium saucepan. Add the green onions and saute until tender. It may look like a lot of onion, especially if you're not a huge onion fan, but it is important to the flavor, which is not a strong onion flavor, so use them all!

Stir in the flour, salt and pepper and stir well. Cook until it begins to bubble. Stir in the milk and cook until thickened and bubbly, stirring almost constantly.

Stir in the parmesan cheese and once melted, add a little of the mixture to the beaten egg in a small bowl then add the egg mixture back to the saucepan and cook until it just begins to boil.


Mix the sauce with the noodles and press into a greased 8" or 9" pan. Cover tightly with aluminum foil, pressing down on the noodles, and chill in the refrigerator for several hours or preferably, overnight.


To finish the croquettes, cut the chilled pasta into squares and working a few at a time, first thoroughly coat the squares with flour. Next dip them in the beaten egg/water mixture and finally coat them completely with the breadcrumbs.


Fry them in oil until crispy and brown on all sides, turning as you go. I used canola oil, you can also use vegetable or any oil of your choice. Set them on a paper towel to drain until all squares are done.

Place them on a baking sheet or in a baking dish and heat in the oven for about 15 - 20 minutes (you can put them in with the chicken), until thoroughly heated throughout. Depending on how you fry them and the type of pan and oil you use, they may be heated through after frying, but putting them in the oven won't hurt them and it keeps them all warm until ready to serve.


I prefer these with a little marinara on top, it really pulls all the flavors together, but you can also serve them plain or top them with a slice of provolone cheese when you put them in the oven and let it melt on top. Mmmmm! I just can't get enough of this dish.

You can store any leftovers covered in the fridge, but reheat in the oven, rather than the microwave, and they will come out tasting like you just made them.


· · · · · · · · · · · · · · · · · · · · · · · · · · · · · · · · · · · · · · · · · · · · ·

TIRAMISU CUPCAKES


Ingredients
1 1/4 cup cake flour
3/4 tsp baking powder
1/4 tsp salt
1/4 cup milk
1 vanilla bean, halved and seeds scraped
4 Tbsp butter, room temp and cut into pieces
3 large eggs plus 3 egg yolks, room temp
1 cup sugar

Coffee-Marsala Syrup
1/3 cup plus 1 Tbsp strong brewed coffee or espresso
1 ounce sweet Marsala wine
1/4 cup sugar

Mascarpone Frosting
1 cup heavy cream
8 oz mascarpone cream, room temp
1/2 cup powdered sugar

Preheat the oven to 325° and line 16 standard muffin tins with paper liners or grease and flour the cups.


If you've never used a vanilla bean, it will be a fun adventure. They are expensive and a little bit of work, but well worth the flavor in a dish like this.


Cut one vanilla bean in half lengthwise and scrape out the seeds, placing them, along with the empty pod, into a medium saucepan with the milk. Heat over medium until bubbles appear around the edges. Remove from heat and whisk in the butter until melted.

Let stand about 15 minutes and strain through a fine sieve or strainer into a bowl. Discard the bean pod and set the butter mixture aside.


Sift or whisk together the flour, baking powder and salt, set aside.

With an electric mixer on medium speed, beat together the whole eggs, egg yolks and sugar in a heat safe bowl until combined. Set the bowl over a pan of simmering water and whisk by hand until all the sugar is dissolved and the mixture is warm to the touch.

Remove the bowl from heat and beat again with the electric mixer on high until pale and fluffy and thick enough to hold a ribbon on the surface for several seconds.


Gently fold the flour mixture into the egg mixture in three batches. Stir 1/2 cup batter into the strained butter mixture then fold it back into the batter stirring gently until just combined.


Divide the batter among the cups, filling about 3/4 cup full and bake for about 20 minutes, rotating tins halfway through, until center is set and edges are light golden brown. Cool on a wire rack.


To prepare the syrup, stir together the coffee, marsala wine and sugar until dissolved. Brush the syrup on top of the cupcakes, repeating until all syrup has been used. The tops will get soggy, but they will be covered with frosting so it's ok!


To prepare the frosting, beat the cream with an electric mixer on medium speed until stiff peaks form. In another bowl, whisk together the mascarpone cheese and powdered sugar until smooth. Gently fold the two together until thoroughly mixed.


Dollop the frosting onto the cupcakes and dust with cocoa powder before serving. I guarantee everyone will be impressed by the amazingly light, spongy texture of the cupcakes and the rich creaminess of the frosting.

If you don't plan on gobbling them all up at once, I recommend keeping the frosting and cakes separate and topping each before enjoying. They get a little soggy and the frosting starts to thin out after a day or two.


· · · · · · · · · · · · · · · · · · · · · · · · · · · · · · · · · · · · · · · · · · · · ·


I told you it was a lot of work, but this is definitely a meal to impress. I made it for my Dad on Father's Day and plan to try it out on some chef friends of ours - it's that good. At least I think so, and I hope you do to.

I'd love to hear what you think and how it goes if you try out any of these recipes! Have fun :)

Tuesday, June 15, 2010

In the Kitchen: It's Strawberry Season!


For me, nothing says summer like strawberries! Here in Northeast Ohio, they're the first fruit ready for picking and since they aren't available (even in stores) for most of the year, I tend to go a little crazy when I see the juicy red berries come to life.

Aside from my standbys of strawberry lemon marmalade and cheesecake with strawberry sauce, I try to make different treats each year. I'm not always successful with my kitchen endeavors but today I have three delicious recipes to share that I couldn't be happier with – strawberry cupcakes with strawberry cream cheese frosting, strawberry crumble pie and strawberry scones.

My initial pick of about five quarts got me through these three recipes, two failed frosting attempts, a batch of cheesecake sauce and plenty of daily eating. Just in time to head back out and pick the second batch of bloomers. Get your buckets ready and read on for the recipes, how-to's and printable recipe cards. Happy Picking!

· · · · · · · · · · · · · · · · · · · · · · · · · · · · · · · · · · · · · · · · · · · · ·

Strawberry Cupcakes with Cream Cheese Frosting


If you aren't tempted to lick your computer screen right now, you better check your pulse. These cupcakes are like heaven in a little fluted liner. Perfectly moist, soft and fluffy with a zen like balance of fresh and sweet. Plus they're pink, which automatically kicks up the awesomeness a few notches. They're also pretty easy to make, so what are you waiting for?


Ingredients yields about 16 cupcakes
1 1/3 cup unbleached flour
1/4 cup cake flour
1 1/2 tsp baking powder
1/4 tsp salt
1 stick butter, room temperature
1 1/8 cup sugar
3/4 tsp vanilla
2 eggs
1/2 cup milk
1 cup finely chopped fresh strawberries

Frosting
8 oz cream cheese, room temperature
1 stick butter, room temperature
2 cup powdered sugar
1 Tbsp + 1 tsp strawberry puree


Preheat the oven to 350° and line muffin tins with paper liners. I often bake muffins (and some cupcakes) without liners but I find these cupcakes work better in liners.

If you have trouble finding cake flour, look by the cake mixes rather than the bags of flour. It's in a box and looks like a cake mix so it's hard to spot if you haven't seen it before. Pillsbury Softasilk is the most common brand but there are others, too. It does make a difference in this recipe, so do use it.

Sift together the flours, baking powder and salt, set aside.


With an electric mixer (stand or hand), cream together the butter, sugar and vanilla on medium high speed. Add the eggs one at a time and beat until just mixed.

On low speed, beat in half the flour mixture, then half the milk, then the remaining flour and lastly the remaining milk, beating until well mixed. Gently stir in the strawberries by hand.


Spoon batter into prepared liners, filling about 3/4 full. I have one 12-cup muffin pan and two 6-cup muffins pans for recipes that make more than 12 cupcakes. Having the smaller 6-cup tins allows for better baking when you have 3-4 extra cupcakes and having two of them allows for two full 12-cup batches.

Bake for 15 minutes and rotate tins in oven. Bake for another 10 - 15 minutes until the tops are lightly golden and a toothpick inserted in the center comes out clean. Cool the tins on a wire rack for 15 minutes then remove the cupcakes from the tins and allow to cool completely before frosting.


To make the frosting, you'll first need a little strawberry puree. Finely chop about 5 - 8 strawberries (depending on size) and mash them in a bowl with a fork or masher until pureed.

Next, cream together the butter and cream cheese with a electric mixer. Beat in the strawberry puree followed by the powdered sugar, one cup at a time. Beat until well blended and thick. Add additional powdered sugar as needed to taste or for thickness. Do note, this frosting will be a little thinner than a standard cream cheese or buttercream frosting because of the strawberries. Chill it in the refrigerator for 30 - 60 min before piping and it will work nicely.

My piping is a little sloppy because I was impatient (and running out of daylight), so I piped my cupcakes before the frosting chilled enough. It still works just fine and wont run off the cupcakes, but will look much prettier and stay put a bit better if chilled.


All that's left now is to enjoy! If these don't make it into someone's belly the first day, store them in an airtight container in the fridge for up to a week. Allow them to sit for at least 30 minutes (or longer) and warm to room temperature before eating. Trust me on that one, they're too hard when cold but just as good as fresh baked after they warm up, even a week later. Fat chance if they make it past day two.


· · · · · · · · · · · · · · · · · · · · · · · · · · · · · · · · · · · · · · · · · · · · ·

Strawberry Crumble Pie


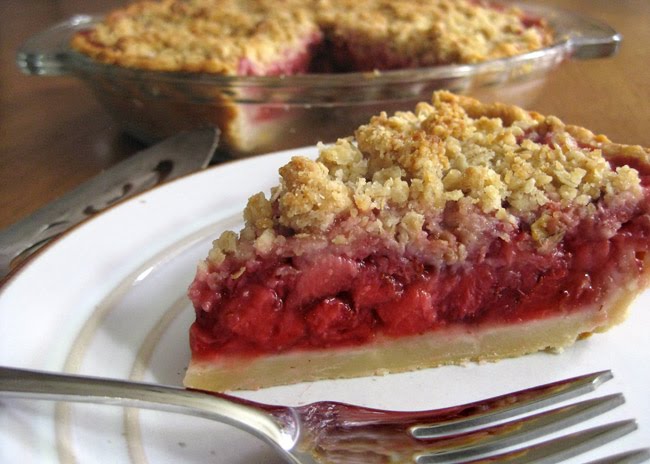
If pie is more your thing, listen up. Chances are you are used to cold strawberry pies, topped with piles of whipped cream or made chiffon style. And while there's nothing wrong with those classics (trust me, I'll throw back a piece or seven), you don't often see a warm, gooey baked strawberry pie. Topped with a sweet crunchy crumble, sitting atop a chewy cream cheese crust you say? Yes, please.

It's not a very sweet pie, it lets the simple strawberry filling speak for itself, but the crumble topping adds a sweet crunch and the buttery cream cheese crust has the perfect bite. I don't even like fruit pie, let alone warm fruit pie, but I've been on this one like a duck on a slug.


Ingredients
Crust
1 stick butter, slightly softened
3 ounces cream cheese, slightly softened
1 1/4 cups unbleached flour
1/8 tsp salt

Crumble
1/3 cup sugar (I use raw turbinado sugar)
1/2 cup unbleached flour
3/4 cup old fashioned or quick-cook oats
4 Tbsp melted butter, cooled

Filling
5 generous cups quartered strawberries
1/2 cup sugar (if you like a sweeter pie, use 2/3 cup)
2 tsp fresh squeezed lemon juice
2 Tbsp cornstarch
2 Tbsp flour
1/4 tsp grated orange zest


To make the crust, beat together the butter and cream cheese until combined. If you have a food processor, you can make the crust in there, otherwise, you can use a hand mixer and a spoon!

Add the flour and salt and mix until blended. Dough will start to come together but still be in pieces. Remove the dough from the bowl and shape into a disk. Wrap in plastic and refrigerate for 45 minutes.


While the dough is chilling, you can make the crumble topping. Combine the sugar, flour and oatmeal in a small bowl, stir until blended. Add the melted butter (cooled slightly) and stir until incorporated. Refrigerate until ready to use.


Back to the dough! Once chilled, remove from the fridge and on a lightly floured surface, roll to about 1/8" thick and large enough to fill a 9" pie pan.


I find the easiest way to transfer dough to a pie dish is to roll it around the rolling pin (add a little flour as you go so it doesn't stick to itself). Hold the rolling pin over the pie dish and unroll over the pan.

Press to fit as needed, trim edges about 1/4 above rim of pan and shape as desired.

Now, I'll tell you, I've never been all that fond of rolling pie dough. It really is a fine art but I do ok after years of practice. However, this dough is a different story. It's soft, it's hard to work with, it will probably tear and make you go crazy. But don't worry! Just smoosh it back together and move on. It won't look pretty, but it doesn't have to. The deliciousness will far outweigh a less than perfect fluted edge and everyone will be so impressed that you even made the dough, they won't care what it looks like.

Place the crust back in the fridge for 15 minutes and preheat the oven to 350°. Once chilled, prick the bottom of the dough with a fork and bake the empty crust for 15-20 minutes until lightly golden. Place on a wire rack to cool while you prepare the filling.


Increase the oven temperature to 375°.

Add the lemon juice and orange zest to the strawberries and toss gently to combine. Next add the sugar, cornstarch and flour, stirring gently until thoroughly mixed.


Spoon the strawberries into the crust and top with the chilled crumble mixture.

Bake for 50 minutes until topping is golden brown and filling starts to bubble. Place on a wire rack and let cool slightly before serving.


As I mentioned earlier, I find this pie best served warm, slightly gooey and syrupy and just cool enough to not burn your mouth. You certainly can eat it cold, which is how I usually like my pie, but I think you lose the sweetness of the strawberries and pick up more of the flour taste in the filling when it's cold.


Store any leftovers in airtight container in the fridge and heat slices in the microwave for about 30 - 45 seconds before serving.

I'll end by simply saying, look at that crust…


· · · · · · · · · · · · · · · · · · · · · · · · · · · · · · · · · · · · · · · · · · · · ·

Whole Wheat Strawberry Scones


Scones – you either like 'em biscuity (like me), like 'em sweet (like my parents) or you don't really know what they are (like my husband). Essentially a scone is a small british quickbread of scottish origin. It was originally round, flat and baked on a griddle but the invention of baking powder took this treat to a new level and the common triangle or wedge shape took popularity to minimize dough wastage.

Most scones in the US these days are sweeter than their foregin counterparts and often topped with icing, but I prefer mine less sweet with a sprinkling of coarse sugar and made with whole wheat flour for extra nutrition. You could equate my recipe below to a slightly sweetened fresh strawberry biscuit and for me, it doesn't get much better than that on a rainy Sunday morning.

Ingredients
1 cup whole wheat flour*
1 cup unbleached flour
1/3 cup sugar
2 tsp baking powder
1/8 tsp salt
6 Tbsp butter, slightly softened
2/3 cup cream
1 1/2 cup fresh strawberries

Topping
1 egg + 1 Tbsp cold water
Coarse sugar

*You can omit the whole wheat flour and use 2 cups total white flour if you prefer.


Preheat the oven to 400°.

Coarsely chop the strawberries and let sit in a colander for about 5 -10 minutes to drain any excess liquid. Toss with about 1 Tbsp sugar and set aside.

Mix flours, sugar, baking powder and salt in a large bowl. Cut the butter into cubes and cut it into the flour mixture using a pastry blender, fork or two knifes until it resembles coarse, pea sized crumbles.

Stir in the strawberries and then add the cream, stirring gently until combined and dough starts to hold together.


Transfer the dough to a lightly floured surface (it will be a little sticky, add a little flour as needed) and shape into a disc about 1" thick. Cut into 6-8 wedges and transfer to a parchment lined baking sheet. Alternatively you can shape the dough into a rectangle, cut two squares and then cut each square in half forming 8 triangle scones.

Bake at 400° for 15 minutes.


In a small bowl, whisk together one egg and one tablespoon of water (alternatively you can use milk). Remove the scones from the oven, brush with the egg wash and generously top with coarse sugar. I use raw turbinado. You can skip this step if you prefer and top with a powdered sugar icing if you like a sweeter treat but I find them perfect with the sparkly, crunchy raw sugar topping.

Return to the oven and bake an additional 5 - 10 minutes until tops start to brown. Mine took an additional 7 minutes. Be careful to not overbake or they will get dry.


Let cool on pan or a wire rack about 10 minutes before munching. I find these most delicious when served fresh out of the oven and slightly warm, topped with a little butter and fresh fruit spread (like homemade peach butter!).

You can store any leftovers in an airtight container in the fridge for a few days and allow them to warm to room temperature or pop them in the microwave for a few seconds before enjoying.

You can also substitute a variety of fresh fruit for the strawberries in this recipe, such as blueberries, raspberries or peaches - yum!


I hope you've enjoyed today's strawberry celebration! I'd love to hear what you think if you give these recipes a try and I'd also love to see you're favorite strawberry recipes. Feel free to share in the comments below and happy picking!

Tuesday, November 17, 2009

In Valorie's Kitchen: A Little Butternut Love


The leaves have turned, the air is crisp and cool. It is definitely fall, and pumpkins are beginning to appear in every nook and cranny throughout the neighborhood. They're also turning up in just about every edible delight this time of year, too, from pie and bread to soup, chili and even coffee.

I love pumpkins, both to look at and to eat. However, the pumpkin varieties worthy of a good recipe are only available in the fall and can even be hard to find in a traditional grocery store. Add to that the inferiority of canned pumpkin, and you have a very short time span when enjoying recipes with fresh pumpkin is possible.

Enter the butternut. A winter squash, butternut has bright orange flesh with a texture and sweetness similar to pumpkin. Available amost anywhere and at most times of year, it makes a good substitute for fresh pumpkin. Not only is it perfect in sweet recipes like pie, bread, and cookies, it fits nicely in the savory scene as well. I love to use butternut in fillings for homemade ravioli, or baked and topped with butter as a simple side dish. Most of all, I adore the creamy texture and rich flavor of a butternut squash soup.


BUTTERNUT SQUASH SOUP

What you'll need:
1 large butternut squash, about 3lbs
1 medium shallot, peeled and finely minced
2 tablespoons olive oil
1 teaspoon salt
1/2 teaspoon madras curry powder
1/4 teaspoon ground black pepper
1/8 teaspoon ground nutmeg
4-6 cups chicken stock
1 tablespoon maple syrup
1 tablespoon apple cider vinegar
1/3 cup heavy cream


First, prepare the butternut squash by cutting it in half lengthwise and scraping away the seeds and any stringy, tough flesh from the center. Line a baking sheet with parchment paper and lay the halves flesh-side-down onto the paper. Bake at 350° for 45-50 minutes, or until the texture is soft under gentle pressure. The skin beginning to shrivel slightly and the juices starting to caramelize around the edges are good signs that it's done. Remove the pan from the oven and let it cool.


Use a spoon to scrape the cooled flesh out of the shells and into a large (8-quart or bigger) sauce pan. Set this aside.

In a small skillet, warm the olive oil. Add the shallots and sautee them with a pinch of salt until they are soft and begin to brown slightly. Add the remaining salt, curry powder, pepper, and nutmeg. Mix and continue cooking for about a minute more when the combination becomes fragrant.


Add this mixture to the squash. Add about 4 cups of the chicken stock to the sauce pan. Using an immersion blender, puree the squash until the texture is smooth and free of any chunks. Add additional stock, as needed. Alternatively, the shallot & squash mixture can be pureed in a food processer in small batches.

Heat the mixture over a medium flame until it reaches a very gentle and slow boil. Add the maple syrup and cider vinegar, mix, and cook for another 1-2 minutes. Next, add the cream, stir, and cook for five minutes longer. Remove from the stove and serve immediately topped with a little grated parmesan or a drizzle of maple syrup. This is great as a cup-sized starter with fresh bread and butter, or in bigger portions, as a main course along side a green salad.

Yields 4 to 6 1.5 cup servings

> Click here for a printable recipe card.

I hope you enjoyed Valorie's contribution to the lillyella kitchen this week! Stop back on December 15 when she'll be sharing a delicious recipe for Stuffed Shells and I'll have one more pumpkin recipe for you on December 1!

You can browse more of Valorie's recipes on her site Kitchen Improv and find previous In The Kitchen posts here.