Tuesday, September 28, 2010

In the Kitchen: Parmesan Mushroom Stuffed Peppers


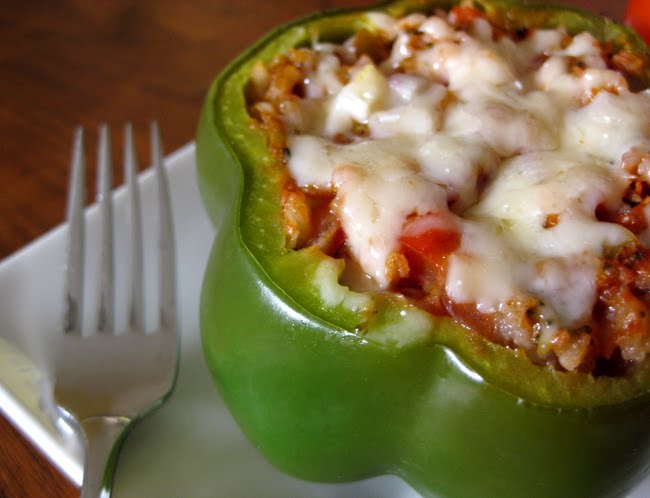
This is my healthy, vegetarian spin on a classic crowd pleaser. Made with brown rice, fresh veggies and a little cheese, you've got just about all your food groups stuffed into one yummy little package, or should I say pepper. This dish is easy to make and can even be whipped up the night before and then popped into the oven to bake when you get home from work. You'll find a printable recipe card at the end of this post.

Ingredients serves 2
2 large bell peppers (any color, I use green and red)
3/4 cup cooked brown rice
2 large cloves garlic, minced
1/4 cup red onion, finely chopped
1 cup sliced fresh mushrooms
1/2 cup broccoli florets, chopped (fresh or thawed frozen work)
1/4 cup low sodium vegetable broth (can also use chicken)
1/4 tsp salt
1/4 tsp fresh ground pepper
2/3 cup salt free tomato sauce (just plain, not spaghetti sauce)
1/3 cup fresh parmesan cheese, grated, plus extra for topping


Preheat oven to 375°. Slice the tops off your peppers and clean out any seeds and membrane from inside. If desired, you can chop up the pepper top (discarding the stem) and add it to your stuffing mixture. Brush the outside of the peppers with a little olive oil and set aside.

Depending on what type of brown rice you are using, you'll want to cook this ahead of time. I use Minute brown rice, which is easy and works well, so I start cooking it when I start making the filling, as it only takes about 5 minutes.

To prepare the filling, saute the minced garlic and red onion with a little olive oil over medium high in a large skillet until tender. Add the mushrooms, broccoli and chopped pepper tops (if desired). Once the veggies are almost cooked through and soft, reduce the heat to medium, add the rice, chicken broth, salt and pepper and simmer until most of the broth cooks away and is absorbed into the mixture.

Remove from heat and stir in the tomato sauce and parmesan cheese until thoroughly mixed and melted. I recommend tasting the filling at this point before you stuff the peppers in case you want to add any additional salt or seasonings.

Spoon the filling into the peppers, stuffing them tightly. I cook mine in a glass loaf pan so if they want to tip over they don't have far to go, but any glass baking dish will do and you can always stabilize them with some foil around the bases.

Cover the dish with foil and bake for 40 - 45 minutes until the peppers start to get soft. I like my peppers slightly al dente, so to say, but you can cook them a bit longer if you'd like them really soft. Remove the foil and sprinkle a little shredded parmesan on the top of the peppers, return to the oven and bake or broil until melted. Serve and enjoy!


Don't like parmesan? Try cheddar. Don't like mushrooms or broccoli? This recipe is very versatile and you can substitute just about any veggies or cheese you wish. For a mexican spin, try using black beans and chopped roasted poblanos instead of the mushrooms and broccoli along with pepper jack cheese.

You can easily double this recipe to serve four or make it as is and stuff four small peppers instead of two. They also reheat well in the microwave or oven for a hearty lunch or second dinner. Enjoy!


And find more easy and delicious recipes here.

Tuesday, August 31, 2010

In the Kitchen: Vegetable Tofu Curry, Sweet or Savory


Yep, I said tofu again. But this time we're frying it up into crisp little cubes of yumminess then mixing it with a heaping helping of curry and a plethora of robust vegetables. This colorful concoction can be made sweet or savory by using apple juice or broth and makes a hearty main entree when served over brown rice, cous-cous or quinoa. Any leftovers make a perfect portable lunch as this dish tastes just as good at room temperature or reheated in the microwave.

Base Ingredients
14 oz firm tofu, 1" cubes pan fried
1 Tbsp canola oil
1 red onion, 1/2 dice
1 clove garlic, minced
2 cups cauliflower florets, 1" pieces
1 carrot, 1/2" slices
2 cups eggplant, 1" cubes
1 red bell pepper, 1" dice
1 sweet potato, 1/2" slices then quartered
1 small zucchini, 1/2" slices
1/2 cup raisins

Sweet Version
2 Tbsp curry powder
1/2 tsp cinnamon
2 cups unfiltered apple juice
1/2 tsp salt
fresh ground pepper

Savory Version
3 Tbsp curry powder
1/2 tsp turmeric
1/2 tsp cinnamon
2 cups low sodium chicken or vegetable broth
1 tsp salt
fresh ground pepper


The first step is to press, cube and pan fry the tofu. To press the tofu, halve the cake horizontally and set the two slabs on several layers of paper towels on a plate or cutting board. Top with additional paper towels and another plate or cutting board then weigh down with a heavy skillet or stock of books and let sit for about 20 minutes.

Once pressed, cut the tofu into 1" cubes.


Coat a large skillet with cooking spray and fry the tofu on medium high heat until crisp and browned on all sides, about 2 - 5 minutes per side. Set aside.


While the tofu is pressing and cooking you can prep the other ingredients. You'll start by cooking the onions and garlic, then add the cauliflower and carrots, so keep them separate. You can place the rest of the vegetables in a large bowl as you cut them, they will be added all at once.


Heat about one Tbsp of canola oil in a large pot or dutch oven. Add the garlic and red onion and saute until slightly softened.

Add the curry and cinnamon (and turmeric if making it savory) and cook until fragrant, about 1 minute. Add the liquid (apple juice or broth), the cauliflower and the carrots. Bring to a boil then reduce heat, cover and simmer for 10 minutes.

Next add the tofu, remaining vegetables, raisins, salt and pepper. Cover and simmer about 20 - 25 minutes, until the vegetables are tender but still hold their shape. Add additional seasonings to taste. You may find you like more salt than I call for, as I try to keep the salt fairly low in most of my dishes.


This dish is delicious served alone or atop a healthy grain like brown rice, cous cous or quinoa. Don't like tofu? Just leave it out or add some chicken. You can also adjust the vegetables to suit your tastes but I find this combination hearty and delicious any time of year. Enjoy!


And find more easy and delicious recipes here.

Tuesday, August 24, 2010

In the Kitchen: Chocolate Cupcakes with Peanut Butter Frosting


When asked what my favorite dessert is, I've never really had a definite answer - until I made these. See, me and peanut butter have this 'special' relationship that I just can't describe. I'm sure some of you understand. And my guess is you're either licking your computer screen right now or gagging at the thought of it, because peanut butter kinda seems like one of those things you either love or hate.

Understanding that everyone's tastes are different, I'll simply say it's my opinion that you won't find a more perfect chocolate cake or peanut butter frosting than this. Don't love peanut butter? Don't worry — these cupcakes are the perfect base for topping with anything your heart desires. Insanely moist, dark and rich, no one will ever know they are made with whole wheat flour and are low in sugar compared to many. Don't worry, I won't tell your other recipes you have a new favorite.

Ingredients
6 Tablespoons unsalted butter, room temp
1/3 cup sugar*
1/3 cup brown sugar, packed
2 large eggs, room temp
1 tsp pure vanilla extract
1/2 cup plus 1 Tablespoon buttermilk, room temp
1/4 cup sour cream, room temp
1/2 cup plus 6 Tbsp whole wheat pastry flour
1/4 cup cocoa powder
1/4 cup dutch process cocoa powder
3/4 teaspoon baking soda
1/4 teaspoon salt

Frosting
1 cup powdered sugar
1 cup creamy natural peanut butter
5 Tablespoons unsalted butter, room temp
1/2 teaspoon pure vanilla extract
1/8 teaspoon salt
1/3 cup heavy cream

*If you find you like a sweeter cupcake, increase the sugar to 1/2 cup. Sweeter still? Also increase the brown sugar to 1/2 cup.

Preheat the oven to 350° and line a 12 tin muffin pan with paper liners or grease and lightly flour cups.


In a medium bowl, sift together the flour, cocoa powders, baking soda and salt. Set aside. In another bowl or measuring cup, whisk together the buttermilk and sour cream, set aside.

With an electric mixer (hand or stand) in a large bowl, cream together the butter and sugars until light and slightly fluffy. Add the eggs, one at a time, followed by the vanilla and mix until well blended.


Next add the buttermilk and the flour mixtures, alternating one third of each at a time starting with the buttermilk and ending with the flour, beating on low speed. Mix just until blended.

Divide the batter evenly among 12 prepared cups and bake at 325° for 17 - 20 minutes until a toothpick inserted in the center comes out mostly clean. Cool for about 15 minutes in the pan then transfer to a wire rack and cool completely before frosting.


To make the frosting, place all ingredients in a large bowl and beat first on low speed, then on medium high until smooth and creamy. Scrape down the sides of the bowl as needed.

Do note that I use natural peanut butter for this recipe, meaning nothing in the jar but peanuts. No sugar, no salt, no additives of any kind. You certainly can use a brand like Jif but it will make a much sweeter and intense frosting, and I don't recommend it.


I use a pastry bag to pipe on the frosting, and if you do so, you can chill the frosting in the fridge a bit to make it easier to work with. Alternatively, you can simply spread it on with a butter or frosting knife right after making it. Just be sure your cupcakes are completely cooled or the frosting will melt right off.

If you use a pastry bag, I do recommend using a disposable one. After all, it is peanut butter, so you can imagine how fun the cleanup is :)


If you wanna go all out, top these babies with some mini chocolate chips or chocolate shavings after frosting. If you aren't serving these right away or if you have any leftovers (fat chance), store them in an airtight container the fridge but allow them to warm back to room temperature before serving.

So now that I've hyped these up so much, I hope you aren't let down, and I'd love to hear what you think. Enjoy!


And find more easy and delicious recipes here.


Tuesday, August 17, 2010

In the Kitchen: Tofu Spinach Lasagna


I know, I said tofu, but don't be scared. If you're one of those people whose gag reflex is induced at the sheer sound of the word, give me a chance to change that. In this recipe, the tofu is a healthier alternative to what would normally be ricotta cheese, which I've never been too fond of (except in pancakes, but that's another post…) and trust me, no one will ever know the difference.

And while you can certainly call this lasagna homemade, the use of a few convenience products make this dish a breeze to whip up any night of the week. Want to beef it up for the carnivores in your life? Add some cooked chicken or sliced sausage before baking. Read on for the recipe and find a printable recipe card at the end of this post.

Ingredients:
12 oz. Soft Silken Tofu
1 1/4 cup (5 oz) shredded mozzarella (divided use)
1 teaspoon fresh lemon juice
1 teaspoon salt
1/2 teaspoon fresh ground pepper
1 tablespoon extra virgin olive oil
2 cloves garlic, minced
14 oz can diced tomatoes (I use salt free)
14 oz can cream of tomato soup
8 oz can tomato paste
6 sheets lasagna noodles*
6 oz fresh spinach
8 oz fresh mushrooms
1/2 cup shredded parmesan cheese

*You can use regular or no cook (oven ready) lasagna noodles. I use whole wheat noodles that need to be boiled before using because I can't find oven ready wheat ones. If you use no cook noodles, just take them right from the box to the pan and skip the boiling.

Preheat the oven to 350° and a coat a 13" x 9" baking pan with cooking spray.

If using noodles that need to be boiled, get those started while you prepare the filling and sauce. They usually need to boil for about ten minutes.


To prepare the sauce, heat the olive oil over medium high heat in a medium saucepan and saute the minced garlic until fragrant, about 2 minutes or so. Add the can of diced tomatoes with their juice and cook until they are about half broken down. Add the cans of tomato soup and tomato paste, reduce the heat and simmer for about 5 minutes.

In the meantime you can prepare the filling. In a medium mixing bowl, use a fork to combine the tofu, 1 cup of the mozzarella, lemon juice, salt and pepper until it is broken up and well blended.


To assemble the lasagna, spread about 1 cup of sauce in the bottom of the prepared baking dish. Lay three sheets of pasta in the dish, leaving a bit of space around each one. Spread the tofu mixture evenly over the noodles then top with a layer of spinach and a layer of mushrooms.


Place the three remaining sheets of pasta on top of the vegetables, followed by the remaining sauce, 1/4 cup mozzarella and the 1/2 cup parmesan.

Cover with foil and bake for about 35 minutes until heated through and bubbly. Remove the foil and bake another 5 - 10 minutes until the cheese starts to brown and bubble. Let stand about 10 minutes before cutting and serving.


I made this dish fairly light on the cheese, which I prefer. It leaves you feeling full and satisfied without that weighed down feeling. You can, however, add a layer of cheese inside on top of the veggies or add more to the top if that's how you like it!

It's also a thin lasagna, but makes a good amount to serve about 5 - 6 (depending on your appetite :). If you'd like a bigger batch, simply double the filling, add an extra can of diced tomatoes to the sauce, cook an additional three sheets of pasta and add an extra layer. Also as I mentioned in the beginning of the post, try adding some cooked chicken or sliced sausage before baking for the meat eaters in your household. Hope you enjoy! I'd love to hear what you think of the tofu.


And find more easy and delicious recipes here.

Tuesday, August 10, 2010

In the Kitchen: Maple Pecan Muffins


I have a goal. That goal is to share recipes at a time when it makes sense to share them. For example, strawberry recipes when strawberries are ready for picking, and so on. This, however, doesn't always work out due to my lack of planning, or in this case, my lack of patience.

I first made these muffins back in March when the maple syrup was flowing in Pancake Town, USA, and while I missed the boat on sharing them then, I knew I couldn't wait an entire year and figured they'd be perfect for the Fall. This is where my impatience comes in, as you can see it's August and here they are. Close enough, right?

Ingredients
1/2 cup butter, softened
2/3 cup superfine sugar
2 Tbsp ground almonds
2 eggs, lightly beaten
2/3 cup pecans, coarse chopped
1 cup whole wheat pastry flour*
1 cup unbleached flour*
1 1/2 tsp baking powder
2 tsp baking soda
pinch salt
3/4 cup buttermilk
9 Tbsp pure maple syrup
12 pecan halves

*You can also sub 2 cups whole wheat pastry flour or 2 cups all-purpose flour in place of the flours specified.

Preheat the oven to 375°. Line 12 muffin cups with paper liners or grease and flour.


Beat the butter and sugar together until light and fluffy. Stir in the ground almonds then slowly beat in the eggs. Next stir in the chopped pecans.


Sift the flour, baking powder, baking soda and salt into the butter mixture.

In a small bowl, blend the buttermilk with 6 tablespoons of the maple syrup. Pour it into the butter and flour mixture and blend gently until just combined, be sure to not overmix or your muffins will be tough.

Divide the batter into prepared cups, filling about 2/3 full. These muffins will rise quite a bit, so be sure not to overfill. Top each muffin with a pecan half and bake for 20 minutes, or until risen and firm to the touch.


Cool in the pan for about 5 minutes then transfer to a wire rack. Brush the remaining 3 tablespoons of maple syrup on top of the hot muffins until it is all gone.


These muffins are delicious served warm or cold — morning, noon or night. I also find them especially delicious with my Sweet Potato Chili, which I will be waiting 'til the Fall to share, maybe…


And find more easy and delicious recipes here.

Tuesday, July 27, 2010

In the Kitchen: Mini Oreo Cheesecakes


Why yes, that is a mini cookies and cream cheesecake with an Oreo for a crust. Need I say more? I think not.

Ingredients
21 oreos (15 whole plus 6 coarsely chopped)
1 pound (16 oz) cream cheese, room temp
1/2 cup sugar
1/2 tsp pure vanilla extract
2 large eggs, room temp
1/2 cup sour cream
1/8 tsp salt


Heat oven to 375° and line 15 muffin cups with paper liners. Put one whole oreo in the bottom of each lined cup and crush the remaining 6 oreos into small pieces, but not crumbs.


With an electric mixer on medium-high speed, beat the cream cheese until smooth. Gradually add the sugar and beat until well mixed.

Beat in the vanilla and eggs, scraping the bowl as needed, until well blended. Lastly beat in the sour cream and salt and then stir in the chopped oreos by hand.


Fill the cups with the batter almost right to the top of the liner. The cheesecakes will not rise, and if anything, they will sink a bit after cooking, so you can fill them all the way up.

Bake for 11 minutes, rotate the tins and bake for another 11 minutes or until the center is set.

Cool completely in the tins on a wire rack then transfer to the fridge and cool in tins for at least 4 hours or overnight. Remove from tins before serving and store leftovers in the fridge for up to a week.


These sweet little temptations require minimal ingredients and are super fast and easy to make. You can also substitute a different cookie such as Golden Oreos, Nilla Wafers or Gingersnaps – or how about those Oreo's with the peanut butter or mint cream centers? Now we're talkin…


And find more easy and delicious recipes here.

Thursday, July 22, 2010

In the Kitchen: Blackberry Corn Muffins


There are so many good things about these muffins, I'm not sure where to start. I guess I'll start by telling you how delicious they are, because that is most important when baking, right? So aside from that (and being really easy to make) you can also substitute any berry you like in place of the blackberries — blueberries, raspberries, strawberries, cranberries, even cherries or yummy tart currants. These muffins are sweet enough for a light dessert but not too indulgent to accompany a fresh salad, a bowl of chili or a hotdog cook-out for lunch or dinner. You'll find a printable recipe card at the end of the post.

Ingredients:
1 1/4 cups unbleached flour
1/2 cup fine-ground cornmeal
2 tsp baking powder
1 tsp salt
1 cup sugar (can reduce to 3/4 cup)
1/2 cup buttermilk, room temp
2 large eggs, room temp
7 Tbsp unsalted butter, melted & cooled
8 ounces fresh blackberries (or other berry)
2 Tbsp raw sugar

Preheat oven to 375° and line 14 standard size muffin tins with paper liners.


If your blackberries are monster sized like mine usually are, cut them in smaller pieces.

In a medium large bowl, whisk together the first five ingredients, set aside.


In another bowl, whisk together the buttermilk, eggs and melted butter. Add to the dry ingredients and whisk until combined. Batter will be thick.


Fill each cup with two slight mounded tablespoons of batter. I use a tablespoon sized cookie scooper (like a mini ice cream scooper), two scoops, it works great. The cups will only be about half full, but you need room to add the berries and they will rise when baking, too.

Next add the berries on top of the batter, pushing in slightly, but not too much. Sprinkle the tops with the raw sugar, you can also use regular granulated sugar if you like but I love the rich flavor of the natural raw sugar (I also use it in the batter).

Bake for 10 minutes, rotate tins and bake another 10 - 12 minutes until light golden brown. Cool completely in tins on a wire rack before removing.


The tops will brown lightly giving them a sweet crunch with the slightly carmelized raw sugar, while the insides stay super moist and delicious. They are best enjoyed soon after baking but will store in an airtight container at room temperature for a couple days, though chances are they won't last that long.

I recently made a batch with some fresh picked sour cherries and they were amazing! So get creative, this batter is the perfect base for almost anything and you can also adjust the amount of sugar you add to it to suit your taste or health requirements. Enjoy!


And find more easy and delicious recipes here.