Tuesday, April 28, 2009

In the Kitchen: Corn Casserole

This week we're cooking up delicious Corn Casserole. It's like cornbread with a twist and is really easy to make. Just a few basic, inexpensive ingredients cook up a big pan that's sure to please. It's a great side dish and perfect for a holiday meal or potluck. The leftovers also store well and can easily be reheated in the microwave or oven. You can even mix it up ahead of time and leave it in the fridge until your ready to bake. You will find a printable recipe card at the end of this post as well as some variations to spice up the dish.

Prep time: 15 min | Cook time: 45 min | Serves: About 8 - 12

What you'll need:
1/2 C (1 stick) margarine, melted
2 eggs
1 tsp salt
1/2 tsp pepper
8 oz sour cream
15 oz can whole kernel corn, drained*
15 oz can creamed style corn
1 box corn muffin mix (I use Jiffy)


In a medium/large bowl, soften/melt the margarine, add the eggs, salt and pepper. Stir until mostly blended.


Next add the sour cream and both cans of corn. Mix again until blended.


Last, add the corn muffin mix, fold in slowly and mix until blended.

Pour into a greased baking dish of your choice. One batch will fill a 13x9 pan or you can use two round dishes, fluted pie pans, smaller rectangles etc. The baking time is usually the same regardless of what shape pan you use.


Bake at 350° for about 45 minutes. Top will begin to crisp and brown and the underneath will remain softer. Let stand about 10 minutes before serving for inside to set a bit. 

*If you would like this dish a little gooier inside, more of a 'corn pudding' with a bready top, do not drain the whole kernel corn. I make it both ways, and both are delicious. 


Aside from being easy and super yummy, what I love about this recipe is the versatility. Eat it as a side dish with herb grilled chicken or ham or top it with country gravy (yummmm). It's also a great, hearty vegetarian dish when served with a salad or fruit. 

You can easily spice up this recipe or make it a meal in itself by adding ingredients such as cheese (cheddar or swiss work great), cubed ham, bacon, or cut veggies before baking. Just be sure any meat or veggies you add are precooked. Even simply adding additional seasonings such as garlic and onion powder or crushed red pepper will give it a different taste. I'd love to hear about what creative ways you find to change up this recipe or if you enjoy it just the way it is!


Looking for more yummy recipes? Click here to see all my previous In the Kitchen posts.

Tuesday, April 21, 2009

Crafting: Tissue Paper Pom-Pom Flowers

Welcome to the first in a new, highly-requested, How-To series! I'm still trying to think of some snappy little title, so that may change one day. Every other Tuesday I'll be bringing you a new project and will cover a broad range of crafts and levels of difficulty. 


This week we're making simple tissue paper pom-pom flowers. I'm highly addicted to making paper flowers of all kinds and will share a variety of others with you in the future but I thought this quick and easy project was a great starter!


What you'll need for one 5" flower:
4 pieces of tissue paper, 10" x 5"
18" piece of thin wire, floral or any other type
Scissors


Stack the four sheets of tissue on top of each other. Make 3/8" accordion folds, creasing after each fold. I find it easiest to make one fold, flip it over, make the other, and repeat, so you are always folding up away from you and it's easy to see.


Fold the 18" piece of wire in half and slip over the center of the folded tissue. Twist the bottom closed. Using sharp scissors, trim the ends of the paper into rounded or pointy shapes. I chose rounded for this one.


Separate the four tissues layers, one at a time until the flower begins to take shape. Depending on what you will use them for, you can keep the bottom flat or you can puff them into a ball for hanging.


You can use these little flowers just about anywhere! I love using them as napkin rings for a summer picnic or when we have guests over. You can use them to decorate a basket or the back of a chair, make a bouquet for a vase or they are beautiful as a bow on a gift.

Try layering different colors of tissue for a beautiful effect or embellishing the centers with buttons or beads. You can also easily make other sizes by starting with different sized tissue. In the future I will show you how to make really big ones to hang from the ceiling. I hope you have fun making these pretty little flowers. I'd love to hear about what uses you find for them!

I'll have a PDF instruction sheet that you can download or print 
available later today.

Tuesday, April 14, 2009

In the Kitchen: Creamy Chicken Enchiladas

This week I have an easy and delicious twist on chicken enchiladas. I've been eating these for as long as I can remember and they've never disappointed. This recipe makes four average sized enchiladas though the sauce can go farther. Simply increase the amount of chicken and tortillas to make more. You will find a link to a printable recipe card at the end of this post.

Prep time: 20 min | Cook time: 20 min | Makes 4 Enchiladas

What you'll need:
skinless boneless chicken, 4 tenderloins or 2 breasts
4 burrito size flour tortillas
1 can (15 oz) cream of chicken soup
16 oz sour cream
1 small can diced green chilies
shredded cheese, cheddar and/or pepper jack


In a large bowl, mix the chicken soup, sour cream and green chilies until well blended. Heat the sauce in the microwave for one minute. This step is not necessary though cuts down on baking time a bit.


Cut thawed chicken into bite sized pieces and cook in a skillet until done. As I've mentioned before, I always cook with chicken tenderloins. We buy them in large bags and thaw them as needed. I use one tenderloin per enchilada though you can adjust this to suit your preference. 

Season the chicken while cooking with a few shakes each of onion powder, garlic powder, black and red pepper and cilantro, or the seasonings of your choice.


Lay a tortilla on a flat surface and spread a little sauce down the center. You can also add some chopped jalapenos if desired. Next add the chicken.


Top with shredded cheese, as much as you like. I use cheddar and sometimes also a little pepper jack. 

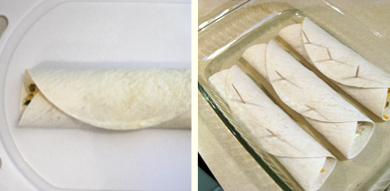
Begin rolling the tortilla tightly, one side at a time.


Roll the other side and lay them in a greased 13 x 9 baking dish. I use toothpicks to keep them closed while cooking. This also helps me indicate which have the jalapenos in them, because mine does not! 

As I mentioned, this recipe will make 4 average sized enchiladas. I only make three as you see above - two large ones for the man and one average size for me. A 13 x 9 pan will hold 4 side by side.


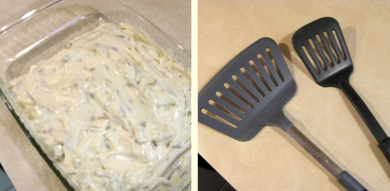
Pour the remaining sauce over the enchiladas and spread evenly. 

Bake at 375° for about 15 minutes or until sauce begins to bubble a bit. Remove from oven and add some shredded cheese on top, return to oven and cook for an additional 5 minutes.

I recommend an oversized spatula for removing them from the pan, as they are kind of floppy! Letting them sit for about 5 - 10 minutes after cooking also makes serving easier.


I like to serve them with spanish rice and black beans with a little sauce poured over the top - delicious!


If you make any of the recipes I post here, I'd love to hear about it!

Friday, April 10, 2009

The Creativity Barn

October 2008

It's been over five months since my last progress update on the creativity barn and I must say, not much progressed in five months. But to our defense, it IS Cleveland and there is only so much you can do in sub zero temperatures! The last update I gave was the photo shown above in October of last year. 

For those who are new to my blog and wondering what this monstrosity is, it's a workshop that my fiance and I are building in our backyard. We began in July last year and you can checkout photos from the very beginning on my flickr page here.

January 2009

By January, we had it all sealed up — plywood, windows etc. Minor progress on the inside but most of the time it was just too cold even with one propane and two kerosene heaters.

February 2009

Temperatures warmed enough in February to find a few days for working so progress inside continued. We put up the insulation, ran most of the electrical and began the drywall, upstairs first.

April 2009

Things got cold again so progress haulted for a bit but the coming of Spring brought some new found energy! The past few weeks have consisted of building a wall upstairs, finishing the drywall and turning the outside pink. It's just about ready for siding.


The upstairs is ready for mud. Do you think we have enough electrical outlets? Cause I'm not really sure …


Next project, staircase. I really hate climbing that ladder!


The downstairs is still a complete disaster but here are a couple shots of what will be the two-story climbing wall — shown from the upstairs and downstairs.

What I haven't showed you yet is the old building we torn down to make room for the new one. I have a hysterical video of the demolition somewhere and hopefully can post that for you soon. So, what do you think — should my first 'how-to' post be plans for your own creativity barn? Maybe not…