

Candy Shop Dessert Table by Amy Atlas
Nope, that amazing creation above isn't mine. I can only strive to create something so perfectly wonderous as an Amy Atlas dessert table. But, I aim high and I hate to disappoint, so Candy Bar perfection is my goal. As I previously mentioned, I decided to go with a big buffet of candy at my wedding for guests to make up their own favor bags, and I'm having so much fun putting it together! Not being so hip on the wedding scene, I had no idea this was such a popular trend these days when I thought about doing it, but that just meant there is a lot of great inspiration and tons of resources out there. Here's a small glimpse at the prep work for my candy bar and the results of last weeks Candy Poll!


Since my wedding will be on the more casual side and we are using old bottles and jars for the table displays, I wanted the candy table to have the same feel to it. There is, of course, no better place to start than with old fashion penny candy jars! You can find really fabulous old ones at antique stores, though they will cost you more than a pretty penny, but I found these in two sizes at Target for right around $5 each.

I had thought about using just the penny candy jars, all one size, two neat rows, but decided to go with variety instead! I already had the two square crackers jars shown left above, though you can also get those at Target and I saw some at Hobby Lobby, too for right around $4 each. The two containers on the right are actually candle holders. Hurricanes and other similar containers work great for this purpose. I found those two at my local Flower Factory for less about $3 each!
The most important thing to keep in mind is how the candy will fit in your containers and how easy it will be to get it out. Some containers may look great but are not very functional. I wanted to avoid anything very tall (too hard to scoop at the bottom!) or with a small opening.

Since I like things a little eclectic, I wanted to add a few different pieces to the mix and I think they will really add a nice touch. I had the white plate which I previously picked up at the Flower Factory for only $1.50 (I'm going to get another one) and I found the small footed dish at TJ Maxx for $7, which is a great place to find all sort of containers. I noticed they especially had a lot of fancier styles, such as apothecary jars, which are beautiful if you are going for a classier look.

Now, I think one of the most important elements to a nicely arranged table is height – having some! You can do this by finding (or making) things to use as risers such as pillars, crates, boxes, cake stands etc. I found this awesome set of four nested cedar crates at Flower Factory for $17 and they are just the look I was going for.
The unfinished wood section of your local craft store is another great place to look. You can find a variety of different sized crates, boxes and shelves that you can stain, paint or finish any way you like. You can also hide your risers under the tablecloth and drape fabric around.

To add just a little more height and variety, I picked up one taller lidded candy jar (also at Flower Factory) for $2.50 and found the awesome photo holder at Hobby Lobby to use for a sign on the table. I really wish they had more than one because I would use them on the cake table, too.
I don't really have the room anywhere to set up the full layout for you (other than across my carpeted floor which looks ugly), so you'll just have to wait until after the wedding to see the finished display :)

Now onto the good part – the candy! You can do two things, either pick your candies based on size and color for overall aesthetics such as the examples shown above, or you can pick candy based on what you think your guests would enjoy eating (or what you would enjoy eating leftovers of!) There are more examples of both further down the post.
I read that averaging about 1/2 pound of candy per guest is good for quantity but that also depends on the favor containers you are using. The little bags I found happen to be 1/2 pound bags so that works for me! I decided on ten different varieties, 5 pounds or so of each and am having about 80 guests. I picked ten varieties because that number of containers worked well on the table and broke up the amount of candy needed nicely but I am going to add in smaller amounts of a few extras that I will set out on the plates and little footed dish I found.
I decided to mainly go with candies I love but did keep color in mind a bit. I was really having a hard time figuring out what a crowd of such varied age would enjoy and the candy poll I posted here last week was really helpful!
I had lots of favorites and ideas in mind so I narrowed it down to 18 different candies and asked everyone to pick their ten favorites. After 150 votes, here are the results:

I never would have guessed caramel squares to be the crowd favorite, though they are yummy. Chocolate covered nuts came in a close second followed by lemonheads, salt water taffy and butter mints (all surprising!) and of course, malt balls – a personal favorite of mine.
Funny enough, my other two favorites came in last, though I'm not all that surprised. Black licorice and Mary Janes, but because it is my wedding after all, I'm going to use them anyways!

Here are the candies I decided to go with: Malt balls, chocolate covered nuts (or bridge mix), caramel squares, chocolate covered raisins (didn't rate too high on the vote but they are mom's favorite!), lemon fruit slices (love lemon AND picked them for color), mix of pink and white gummi grapefruits (again love these and love the color), butter mints (they come in a variety of colors, too, so yellow it is!), mix of red and black licorice wheels, a little plate of mary janes, salt water taffy (while I would love one solid color, I'd rather have a mix of flavors), cow tales (I'll be putting these in the tall candy jar I found), butter rum life savers (one of the only two candies Tyler cares about), cinnamons bears (the second), and last but not least – rock candy! Because it's just so gosh darn pretty :)
Overall, the color palette is not exactly perfect but because the rest of my decorations will be fairly eclectic, I think I can make it work. But most importantly, we have candies that I believe everyone will love!

I am lucky enough to have a huge bulk candy store nearby, B.A. Sweetie Candy Company. I've already, on two occasions, spent hours wandering up and down the aisles. I am able to find most of what I am looking for here but will be ordering a couple items online. In the store, 2lb and 5lb bulk bags are standard, while online it seems 5lb bags are most common. The prices are very similar in the store and online but due to the weight and sometimes heat concerns, be prepared to pay hefty shipping costs when ordering online.
Here are a few good websites I found for ordering bulk candy. You can search by color, flavor, size, theme etc!
www.acandystore.com
www.candywarehouse.com
www.candyfavorites.com
www.bulkcandystore.com
www.groovycandies.com
www.acandystore.com
www.candywarehouse.com
www.candyfavorites.com
www.bulkcandystore.com
www.groovycandies.com
And here is a great resource for candy scoops and tongs (watch out for annoying voice-over):
Im going to get two sizes of metal scoops for most of the candies and small tongs for the gummis and licorice.
Now back to some inspiration! This table I found has a very similar look to what I'll be doing with the wooden rises and casual feel. I really love the subtle color palette. One benefit to ordering your candy online is there seems to be more color choices. You can even get malt balls in different colors!

This is one heck of a buffet! I think I even see some cookies in there. Chocolate covered pretzels are another great option, as well as flavored popcorns or salty treats like potato chips to balance out the sugar!

Here is another beautiful creation by Amy Atlas. This is more of a table of goodies to eat while at the event, rather than to package up and take home as a favor, but it is still a great example to reference.

Here is another example where all the candies fall into a certain palette, and it's quite beautiful. You can see how layering different colors of the same candies look pretty and how using a dish of small candies to hold things such as rock candy or lollipops works nicely.
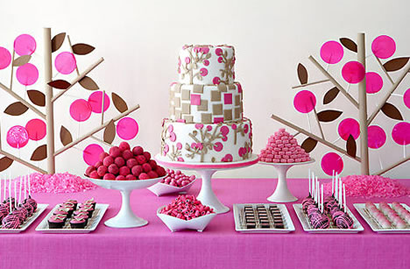
One more dessert table by Amy Atlas. I love how she creates decorations that coordinate with the desserts. Those are lollipops on the 'trees'!

Here you can see how having a variety of color can still look awesome and cohesive if you arrange the table nicely.
Another important thing to consider when choosing your candies is the favor bag or box you want to use. This post was too long to share some good options but I'll do another post about that soon! I love how the bags shown above are customized for the event and notice how they included round stickers for closing the bags, definitely something you need to consider. I think I'm going to fold the tops of my bag overs and use little oval paper clips I found on clearance at the craft store. They have little charms that dangle down with words like love and joy etc. I'll share some pics but I think they will be perfect!
The last thing I need to do is decide if I'm going to label each jar with the type of candy or just include a list on a sign. So much to think about! Ultimately, I could make myself crazy thinking about all the possibilities, compulsively matching all the candies, searching the globe for the perfect containers, but really, all I want to do is eat the candy.


