Tuesday, July 27, 2010

In the Kitchen: Mini Oreo Cheesecakes


Why yes, that is a mini cookies and cream cheesecake with an Oreo for a crust. Need I say more? I think not.

Ingredients
21 oreos (15 whole plus 6 coarsely chopped)
1 pound (16 oz) cream cheese, room temp
1/2 cup sugar
1/2 tsp pure vanilla extract
2 large eggs, room temp
1/2 cup sour cream
1/8 tsp salt


Heat oven to 375° and line 15 muffin cups with paper liners. Put one whole oreo in the bottom of each lined cup and crush the remaining 6 oreos into small pieces, but not crumbs.


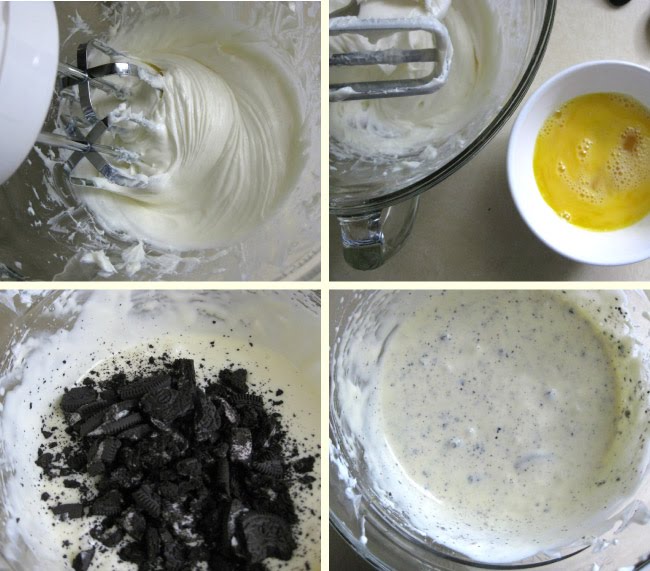
With an electric mixer on medium-high speed, beat the cream cheese until smooth. Gradually add the sugar and beat until well mixed.

Beat in the vanilla and eggs, scraping the bowl as needed, until well blended. Lastly beat in the sour cream and salt and then stir in the chopped oreos by hand.


Fill the cups with the batter almost right to the top of the liner. The cheesecakes will not rise, and if anything, they will sink a bit after cooking, so you can fill them all the way up.

Bake for 11 minutes, rotate the tins and bake for another 11 minutes or until the center is set.

Cool completely in the tins on a wire rack then transfer to the fridge and cool in tins for at least 4 hours or overnight. Remove from tins before serving and store leftovers in the fridge for up to a week.


These sweet little temptations require minimal ingredients and are super fast and easy to make. You can also substitute a different cookie such as Golden Oreos, Nilla Wafers or Gingersnaps – or how about those Oreo's with the peanut butter or mint cream centers? Now we're talkin…


And find more easy and delicious recipes here.

Thursday, July 22, 2010

In the Kitchen: Blackberry Corn Muffins


There are so many good things about these muffins, I'm not sure where to start. I guess I'll start by telling you how delicious they are, because that is most important when baking, right? So aside from that (and being really easy to make) you can also substitute any berry you like in place of the blackberries — blueberries, raspberries, strawberries, cranberries, even cherries or yummy tart currants. These muffins are sweet enough for a light dessert but not too indulgent to accompany a fresh salad, a bowl of chili or a hotdog cook-out for lunch or dinner. You'll find a printable recipe card at the end of the post.

Ingredients:
1 1/4 cups unbleached flour
1/2 cup fine-ground cornmeal
2 tsp baking powder
1 tsp salt
1 cup sugar (can reduce to 3/4 cup)
1/2 cup buttermilk, room temp
2 large eggs, room temp
7 Tbsp unsalted butter, melted & cooled
8 ounces fresh blackberries (or other berry)
2 Tbsp raw sugar

Preheat oven to 375° and line 14 standard size muffin tins with paper liners.


If your blackberries are monster sized like mine usually are, cut them in smaller pieces.

In a medium large bowl, whisk together the first five ingredients, set aside.


In another bowl, whisk together the buttermilk, eggs and melted butter. Add to the dry ingredients and whisk until combined. Batter will be thick.


Fill each cup with two slight mounded tablespoons of batter. I use a tablespoon sized cookie scooper (like a mini ice cream scooper), two scoops, it works great. The cups will only be about half full, but you need room to add the berries and they will rise when baking, too.

Next add the berries on top of the batter, pushing in slightly, but not too much. Sprinkle the tops with the raw sugar, you can also use regular granulated sugar if you like but I love the rich flavor of the natural raw sugar (I also use it in the batter).

Bake for 10 minutes, rotate tins and bake another 10 - 12 minutes until light golden brown. Cool completely in tins on a wire rack before removing.


The tops will brown lightly giving them a sweet crunch with the slightly carmelized raw sugar, while the insides stay super moist and delicious. They are best enjoyed soon after baking but will store in an airtight container at room temperature for a couple days, though chances are they won't last that long.

I recently made a batch with some fresh picked sour cherries and they were amazing! So get creative, this batter is the perfect base for almost anything and you can also adjust the amount of sugar you add to it to suit your taste or health requirements. Enjoy!


And find more easy and delicious recipes here.

Tuesday, July 13, 2010

In the Kitchen: Chicken Florentine Meatballs


Today's recipe comes upon special request from the lovely, and very pregnant, Jill of jillry. She recently contacted me in search of freezer-friendly recipes that she can whip up ahead of time and her husband can easily pop in the oven after the little one arrives. These chicken florentine meatballs have been on my 'upcoming recipes' list and seeing as how I had just taken a bag out of my freezer, they immediately came to mind. Easy to make, easy to freeze, delicious and healthy, these meatballs are an all around winner. You'll find a printable recipe card at the end of this post.

Ingredients
2 eggs, beaten
10 oz frozen spinach, thawed and patted dry
1/2 cup whole wheat bread crumbs
1/4 cup grated parmesan cheese
1 Tbsp dried minced onion
1 garlic clove, minced
1/4 tsp salt
1/8 tsp pepper
1 lb ground chicken, raw


In a large bowl mix the spinach, bread crumbs, parmesan cheese, spices and eggs. Break up the chicken and blend it with the spinach mixture until thoroughly combined. Roll the mixture into balls about 1 1/2" in diameter. Bake the meatballs on a wire rack atop a shallow baking dish at 400° for 20 – 25 minutes or until the chicken is no longer pink.

If you wish to freeze the meatballs, place the rolled, uncooked meatballs in an airtight container or ziploc bag and place them in the freezer. When you are ready to bake, allow them to thaw completely and bake as directed above. When I make a batch of these, I bake half and freeze half for another meal. Each half serves about four.

These meatballs are delicious served plain (which are perfect for appetizers!) or with your favorite type of pasta and sauce. I love them with a simple mushroom marinara and whole wheat pasta but when I have the time, I serve them over spaghetti squash for something a little different.


If you've never had spaghetti squash, it's really quite fascinating and you can prepare it in so many ways - from eating it as a pasta to baking it into a cheesy casserole side dish.

To cook the squash, first cut off the stem and then cut the squash in half. Scrape out the seeds and pulp, but be careful not to go too deep into the flesh or you will start to break up the strands.

Place the two halves cut side down on a foil lined baking sheet and bake at 375° for about 30 - 40 minutes until tender.


Now this is the fun part – once slightly cooled, separate the strands by scraping the flesh with a fork and voila, spaghetti! Well, spaghetti squash. Neat, huh?

Overall, it's fairly flavorless by itself, with just a slight squash/zucchini type taste, so it takes well to anything you top it with – butter, salt, pepper, parmesan cheese or mushrooms, marinara and chicken florentine meatballs!


However you serve these freezer-friendly meatballs, they are a delicious alternative to beef, make a unique appetizer and are a great way to get your kids to eat spinach!


And find more easy and delicious recipes here.

Tuesday, July 6, 2010

In the Kitchen: Mozzarella Stuffed Chicken with Pasta Croquettes and Tiramisu Cupcakes


I'm sure there is a proper way to pound meat, and a proper tool for doing such. But, as with all things in life, if you don't have what you need, improvise. In this house that means a big rubber mallet. Did it get the job done? You bet. Was it perfect? Not even close. But in addition to an impressive meal, I also got a workout.

Now this meal requires some serious patience in the kitchen, and if you have anything less than an over abundance, don't even attempt a single part of it. But if you're feeling frisky, then go or it — and revel in the beautiful bounty you have created. Read on for all the yummy details and find printable recipe cards at the end of the post.

· · · · · · · · · · · · · · · · · · · · · · · · · · · · · · · · · · · · · · · · · · · · ·

MOZZARELLA STUFFED CHICKEN

Ingredients
6 boneless skinless chicken breast halves
1/4 cup shallots, finely chopped
1 clove garlic, minced
6 oz frozen spinach, thawed and well drained
1 cup (4 oz) shredded mozzarella cheese
4 Tbsp pine nuts, toasted
1/4 cup seasoned fine bread crumbs
1/4 cup grated parmesan cheese
1 Tbsp olive oil


To toast the pine nuts, place them in a dry skillet over medium high heat and cook until they start to brown and become fragrant.


If you've never used a shallot, it's kind of like an onion that looks like a big purple bulb of garlic. You can find them in the produce section of your market near the onions or garlic. Peel off the skin, just like you would garlic, and chop em up.

To make the filling, saute the shallot and garlic in a skillet with some olive oil until tender. Remove from heat and stir in the spinach, mozzarella and pine nuts. Set aside.


And now we pound the meat. As I mentioned, I'm sure there are better tools to do this that a rubber mallet, but it gets the job done. I placed the breast, one at a time, in a gallon zip loc bag and pounded, pushing out a bit, until the breast was about 1/8 thick.

Once all the breasts are flattened, season with salt and pepper if desired. Working one at a time, spoon about 2-3 Tbsp of filling in the center.


Fold in one of the short sides, then the two long sides (as shown in the upper left photo above). Starting at the folded short end, roll the chicken, keeping the sides tucked in, towards the unfolded end and secure with toothpicks.

Brush each rolled breast with olive oil.


Mix the breadcrumbs and parmesan cheese in a bowl and roll each breast until coated. Place seam side down in a shallow baking dish and bake at 400° for about 25 minutes until chicken is tender and no longer pink.


Remove the toothpicks before serving. They may be a little hard to pull out, so feel free to utilize more tools (like a pair of pliers) if needed :)

If you'd like a crispier breading, saute the crumb coated breasts in a skillet with a little oil until browned before baking. These are delicious served as is or you can top with a little marinara or white sauce.


· · · · · · · · · · · · · · · · · · · · · · · · · · · · · · · · · · · · · · · · · · · · ·

PASTA CROQUETTES


Ingredients
8 oz egg noodles
6 Tbsp butter
3 Tbsp green onions, chopped
6 Tbsp flour
1/2 tsp salt
1/4 tsp pepper
1/4 tsp ground nutmeg (fresh is best!)
2 cups milk
3/4 cup fresh grated parmesan cheese
1 egg, beaten

For breading
Flour
2 eggs beaten with 2 Tbsp water
Panko bread crumbs
Oil for frying


Prepare the noodles according to package directions and drain well. Even though my package of noodles said 'wide', I wouldn't consider them wide. They are about the size of fettucini and flat - these will work best.

To make the sauce, melt the butter in a medium saucepan. Add the green onions and saute until tender. It may look like a lot of onion, especially if you're not a huge onion fan, but it is important to the flavor, which is not a strong onion flavor, so use them all!

Stir in the flour, salt and pepper and stir well. Cook until it begins to bubble. Stir in the milk and cook until thickened and bubbly, stirring almost constantly.

Stir in the parmesan cheese and once melted, add a little of the mixture to the beaten egg in a small bowl then add the egg mixture back to the saucepan and cook until it just begins to boil.


Mix the sauce with the noodles and press into a greased 8" or 9" pan. Cover tightly with aluminum foil, pressing down on the noodles, and chill in the refrigerator for several hours or preferably, overnight.


To finish the croquettes, cut the chilled pasta into squares and working a few at a time, first thoroughly coat the squares with flour. Next dip them in the beaten egg/water mixture and finally coat them completely with the breadcrumbs.


Fry them in oil until crispy and brown on all sides, turning as you go. I used canola oil, you can also use vegetable or any oil of your choice. Set them on a paper towel to drain until all squares are done.

Place them on a baking sheet or in a baking dish and heat in the oven for about 15 - 20 minutes (you can put them in with the chicken), until thoroughly heated throughout. Depending on how you fry them and the type of pan and oil you use, they may be heated through after frying, but putting them in the oven won't hurt them and it keeps them all warm until ready to serve.


I prefer these with a little marinara on top, it really pulls all the flavors together, but you can also serve them plain or top them with a slice of provolone cheese when you put them in the oven and let it melt on top. Mmmmm! I just can't get enough of this dish.

You can store any leftovers covered in the fridge, but reheat in the oven, rather than the microwave, and they will come out tasting like you just made them.


· · · · · · · · · · · · · · · · · · · · · · · · · · · · · · · · · · · · · · · · · · · · ·

TIRAMISU CUPCAKES


Ingredients
1 1/4 cup cake flour
3/4 tsp baking powder
1/4 tsp salt
1/4 cup milk
1 vanilla bean, halved and seeds scraped
4 Tbsp butter, room temp and cut into pieces
3 large eggs plus 3 egg yolks, room temp
1 cup sugar

Coffee-Marsala Syrup
1/3 cup plus 1 Tbsp strong brewed coffee or espresso
1 ounce sweet Marsala wine
1/4 cup sugar

Mascarpone Frosting
1 cup heavy cream
8 oz mascarpone cream, room temp
1/2 cup powdered sugar

Preheat the oven to 325° and line 16 standard muffin tins with paper liners or grease and flour the cups.


If you've never used a vanilla bean, it will be a fun adventure. They are expensive and a little bit of work, but well worth the flavor in a dish like this.


Cut one vanilla bean in half lengthwise and scrape out the seeds, placing them, along with the empty pod, into a medium saucepan with the milk. Heat over medium until bubbles appear around the edges. Remove from heat and whisk in the butter until melted.

Let stand about 15 minutes and strain through a fine sieve or strainer into a bowl. Discard the bean pod and set the butter mixture aside.


Sift or whisk together the flour, baking powder and salt, set aside.

With an electric mixer on medium speed, beat together the whole eggs, egg yolks and sugar in a heat safe bowl until combined. Set the bowl over a pan of simmering water and whisk by hand until all the sugar is dissolved and the mixture is warm to the touch.

Remove the bowl from heat and beat again with the electric mixer on high until pale and fluffy and thick enough to hold a ribbon on the surface for several seconds.


Gently fold the flour mixture into the egg mixture in three batches. Stir 1/2 cup batter into the strained butter mixture then fold it back into the batter stirring gently until just combined.


Divide the batter among the cups, filling about 3/4 cup full and bake for about 20 minutes, rotating tins halfway through, until center is set and edges are light golden brown. Cool on a wire rack.


To prepare the syrup, stir together the coffee, marsala wine and sugar until dissolved. Brush the syrup on top of the cupcakes, repeating until all syrup has been used. The tops will get soggy, but they will be covered with frosting so it's ok!


To prepare the frosting, beat the cream with an electric mixer on medium speed until stiff peaks form. In another bowl, whisk together the mascarpone cheese and powdered sugar until smooth. Gently fold the two together until thoroughly mixed.


Dollop the frosting onto the cupcakes and dust with cocoa powder before serving. I guarantee everyone will be impressed by the amazingly light, spongy texture of the cupcakes and the rich creaminess of the frosting.

If you don't plan on gobbling them all up at once, I recommend keeping the frosting and cakes separate and topping each before enjoying. They get a little soggy and the frosting starts to thin out after a day or two.


· · · · · · · · · · · · · · · · · · · · · · · · · · · · · · · · · · · · · · · · · · · · ·


I told you it was a lot of work, but this is definitely a meal to impress. I made it for my Dad on Father's Day and plan to try it out on some chef friends of ours - it's that good. At least I think so, and I hope you do to.

I'd love to hear what you think and how it goes if you try out any of these recipes! Have fun :)

Friday, July 2, 2010

The Art of Stained Glass: Part 3

Today I have the third and final installment of my stained glass window building project! Last time we left off with cutting glass (check it out here) and now we are ready to build, solder and cement.


The first thing you'll need (aside from a cut window) is lead, lots of it. It comes in a variety of widths, six foot lengths and 110lb boxes. The lead has a heart (the center) and a leaf on either side. It's shaped like an H, or an I beam, and the glass fits into the groove and sits up against the heart.


For this project I am using a 3/8" flat lead for the perimeter of the window and 1/8" round lead for the interior. Above you can see the size difference between the two. The size of perimeter lead that you choose is determined by the size of the rabbit (the cut out for the glass) in the wood frame you will be using. You need the lead to fill the space and extend out a small amount.

The size of lead used for the interior is determined by the intricacy of the design, as well as aesthetic preference. I love the look of a thin lead line for a design like mine and 1/8" lead is the thinnest it comes. This, however, means there is little room for error or imperfection when building because you have less than 1/16" of lead to overlap each piece of glass.


Other tools needed are a vice, pliers, nails, lathekins, a small tack hammer and lead nippers, razor blades or a glazing knife.

The first thing you need to do is stretch the lead using a vice to hold one end and a pair of pliers to yank on the other. This takes the kinks out and makes it more rigid. Above you can see a piece of lead on the right that has been stretched and three pieces next to it that haven't.


You build the window on top of your original cartoon, using it as a guide. Because this window is rectangular, it's built out of a squared corner. You first lay down two pieces of perimeter lead, tucking one into the other in the corner, and begin building out from there. Laying down one piece of glass at time, you hold it in place using small nails.

A piece of lead is used in between each piece of glass. You first bend and form the lead to the glass, then mark the length and trim to size with lead nippers or a knife.


You continue the process building out and up as you go. Determining how to break up the lengths of lead and where to cut is an art in itself that you learn from experience over time, and this is where having Tyler's guidance really helps :)


This process continues until you run out of pieces and then you finish by putting the remaining two pieces of perimeter lead around the outside. Check to make sure the piece still matches the final size and now you're ready to solder.


A 60/40 solder is used for lead, it is 60% tin and 40% lead. It flows smooth, polishes well and produces a cleaner joint compared to 50/50 solder which melts more pasty. The soldering iron is plugged into a rheostat which controls the wattage (and heat output) going to the iron. If your iron is too hot, you can melt away the lead.


In preparing to solder, you first brush the joints with oleic acid, which is a flux used for lead soldering. The flux removes oxidation, seals out air preventing further oxidation and facilitates amalgamation allowing the solder to flow easily rather than forming beads as it would otherwise.

With the soldering iron in one hand and a length of solder in the other, you touch the tip of the iron to the solder then apply it to the lead, covering the joints and smoothing it out between them to join all the pieces of lead. When one side is complete, you wipe off the excess flux, flip the piece over and solder the back side.

Now it's time for the final step of construction, cementing.


Cementing will waterproof and solidify your window. Essentially you are cramming a bunch of gunk in between the lead and the glass which then hardens. There are commercial cement mixes available but they mix their own at the studio. Don't even bother asking what's in it – it's a shop secret. All I know is it stinks.


Once the cement is mixed, you glop it on the window and begin spreading it out, pushing it into the lead with a natural, soft bristle brush. Once you cover the entire window, you brush off as much excess as you can, scraping it back into the cement bucket.


The next step is to sprinkle whiting and fine sawdust on the window. Whiting is calcium carbonate which, in conjunction with the sawdust, helps to draw the oils out of the cement. It also buffs the lead and the glass.

You wipe the powder and sawdust around the window with a rag, scrubbing off some of the excess cement and cleaning the oils off the lead and glass. At this stage, you flip the window over and repeat these steps on the back side.


Once both sides are done, you go back to the front side and using a small pick (such as an old dart), you scrape along all the edges of the lead, removing excess cement. It's about this time that you should be thinking to yourself, 'damn, that looks tedious.' Yeah, it is.

You then brush off all the pickins and with a hard natural fiber brush, you take off what the pick didn't. You then sprinkle the window with more whiting and sawdust, flip the window back over and repeat the process on the back side. You continue this, going back and forth, until the cement stops oozing out from between the glass and the lead. See, tedious.


When you see no more cement leaking out, the final step is to polish the lead and glass with a clean, soft, natural bristle brush. Using a brisk brushing motion, you darken and oxidize the lead and solder to a uniform, dark pewter color.

The window is now ready for installation. So,who's thinking 'this is way too much work for me!'? It is a long tedious process but I think you'll agree, the outcome is well worth the time and energy put into it.


I didn't create this piece to fit into a specified window or space, but rather just to take advantage of my chance to use the shop before it closes and create one more piece to treasure. I built it to fit into an old cabinet frame that was in the attic of the shop.


For now I hope to find a spot to keep it in my new workspace and then in the future I can hang it as is in window, on a wall, build a lightbox for it or even put it into a new frame or window opening in the house.

So, what do you think?


I hope you've enjoyed learning more about this classic art form and maybe found a little inspiration along the way. Even if you never get to dabble with this medium yourself, at least you can say you know how it's done. And as G.I. Joe so wisely said, knowing is half the battle.