Wednesday, October 28, 2009

Our Wedding Cake Buffet

The very first thing I thought about when it came time to plan the wedding was cake. I mean, it is the most important part, isn't it? I knew from the start that a five-tiered, fondant covered masterpiece was not for me. I needed color, I needed interest, I needed flavors and by golly, I needed cake stands!


Tyler and I searched all of our favorite antique stores until we found the perfect collection of cake stands (see them in detail here) and we ended up having eight cakes at the wedding, enough for everyone to have at least two pieces, and of course they were all different flavors!


Meet the bakers! Our best friends Jim and Sal. They went above and beyond creating these masterpieces for us. We would have late night ichat video sessions to discuss flavors and decorations, they even made sample cakes and brought them over for taste testing. How we got so lucky is beyond me, but the day wouldn't have been the same without their special touch and I can't thank them enough.


My mom gave us this cute bird topper as a shower gift and I absolutely loved the white chocolate 'nest' that the guys created around it.


I had small birdbaths filled with taffy at either end of the table, along with a vase of flowers and a candle.


The cake buffet was by far the highlight of the evening! We had everyone come up to be served, giving them the chance to see all the cakes and pick the flavors they wanted. Some people even sampled every flavor! I was so pleased with how it all came together and it really added a unique and special touch to the day.


CRAFTING THE FLAVOR CARDS AND STANDS


I knew I wouldn't be able to find the perfect sign holders for the cake flavor cards, so we of course just made some ourselves! I don't have photos of all the steps because things were a little hectic at this point before the wedding, but you can get the idea.

We started with precut wooden bases in different shapes that we picked up at JoAnns. I also found the small wood flowers there, which we glued to the center of each base. We next drilled a hole through the flower into the base to hold a wood dowel and glued them in place.

We figured out the measurement needed for each stand (because they were all different heights) and cut the dowels. I picked up the small wooden beads at my local craft store to use on top of each dowel to hold the flavor card.


The holes in the round wooden beads weren't quite large enough to fit over the dowels so we drilled them a bit larger, glued them in place and sanded them smooth.

We then used a scroll saw to cut a small slit into the center of each one to hold the flavor card.


We painted them with a light base coat of some leftover paint from our living room. After it dried, we painted them with a darker color and them wiped most of it off, just leaving some dark accents.


To make the flavor cards, I started with the shape I created for the candy bar tags and designed seven different complimenting shapes so that each could be different, like the cakes. I colored them to fit with our palette but also with the corresponding cake. I printed them on heavy cardstock on my inkjet printer and cut them out by hand with scissors. I couldn't have been happier with how it all came together.


If you would like to use this art for your own DIY wedding projects (or anything else!), here are some editable files you can download:

Click here to download an EPS file of the flavor cards (You will need a program that can edit EPS files to use this)

Click here to download the font, Honey Script (Which is a personal favorite of mine, regardless of the use!)

It's tough to save the files in a format that everyone can use, but hopefully I'll have some time in the next week to save a few more formats for you. Please feel free to contact me with any requests or questions in the meantime and check back soon for additional downloads. (p.s. If you share this file elsewhere, please give proper credit - thanks!)

Our Wedding Candy Bar

Finally onto one of the best parts of the wedding — the candy bar! Rather than having favors at each place setting, we decided to go with a big buffet of candy so that everyone could choose what they wanted and have some fun with it. You can read my previous candy bar post here for all the details of how I put this together, determining how much candy you'll need, poll results of peoples favorite treats and resources for containers and bulk candy.


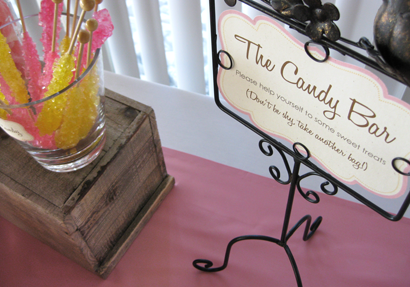
We included an empty bag at each place setting with a note that matched the design of our invites telling people to help themselves to some sweet treats at The Candy Bar.


We had extra bags on the candy table with a sign that included, "Don't be shy, take another bag!"


Overall, it was a huge success! Everyone loved it and I really enjoyed the interactive element of it. One thing I dislike most about weddings is feeling like you are stuck in this seat that you're assigned with no where to go but the bar or the dance floor. With the large deck off the back of our venue, the yard games outside, the candy bar and the cake buffet (more details later!), there were many reasons to get up, walk around and mingle, and this created the exact environment I was hoping for. Plus really, who doesn't love candy?


CRAFTING THE CANDY BAGS


I purchased 1/2 lb size glassine bags from Paper Mart. I wanted them to look more 'finished' so I trimmed the tops with scalloped scissors. Yes, it was kind of a pain, but worth it :)

By accident, I stumbled upon the little paper clips at JoAnn Fabrics on clearance in the scrapbooking aisle. Each had a different word on it like promise, love, memory, etc - they were perfect.


I used the clips to attach a card that I designed to match our invites and figured people could also use the clip to close the bag after filling it. They came out great and I loved how they looked on the tables.


CRAFTING THE TAGS AND LABELS


I was torn as to whether I should label each container with the type of candy inside or if I should just make a sign for the table listing them, since most were self explanatory. But I decided it would be fun and more aesthetically pleasing to design labels, and I really love how they came out.

I created them in Adobe Illustrator and printed them on my inkjet printer. I used ivory label stock for the labels and card stock for the tags. I cut them out by hand with scissors (which turned out to be much easier than I expected) and added two slits on the tags to run ribbon through for hanging. A small knot at the bottom held them in place.


If you would like to use this art for your own candy bar, you can download the files below:

Click here to download an EPS file of the labels. (You will need a program that can edit EPS files to use this)

Click here to download the font, Honey Script. (Which is a personal favorite of mine, regardless of the use!)

It's tough to save the files in a format that everyone can use, but hopefully I'll have some time in the next week to save a few more formats for you. Please feel free to contact me with any requests or questions in the meantime and check back soon for additional downloads. (p.s. If you share this file elsewhere, please give proper credit - thanks!)

Next up on Wedding Week, the cake buffet! Which was just about as fun as the candy bar – stay tuned!

Tuesday, October 27, 2009

Crafting: Our Wedding Napkin Rings


I originally shared these tissue paper pom pom flowers with you in my very first Crafting post back in April. I loved them so much, I knew they would be the perfect addition to my reception table decor. A few modifications to the original design and some grapevine rings were all I needed. Here are step-by-step instructions on how to create your own.

What you'll need for one 4" flower:
3 pieces of tissue paper, 9" x 4.5"
6" piece of thin wire, floral or any other type
1.5" ring (I used mini grapevine wreaths)
Scissors


Stack the three sheets of tissue on top of each other. Make 3/8" accordion folds, creasing after each fold. I find it easiest to make one fold, flip it over, make the other, and repeat, so you are always folding up away from you and it's easy to see.


Fold the piece of wire in half and slip over the center of the folded tissue. Twist the bottom closed. Using sharp scissors, trim the ends of the paper into rounded or pointy shapes. I chose rounded for this one.


Separate the tissue layers, one at a time until the flower begins to take shape. You will keep the bottom flat for this project but can also puff them into a ball to use for hanging or to make a garland.


Last step is to attach them to your rings using the wire tails and snip off any excess wire. I found these inexpensive 1.5" grapevine rings at my local craft store (I have about 100 if anyone would like them!) but any ring of a similar size will do. Macrame rings also work well for this project. They come in the proper size, in both gold metal and white plastic and are very inexpensive.


You can easily modify this project in many ways to suit your needs and decor. You can make them any color you wish and even layer different colored tissue within a flower. You can also change the size of the flower by starting with larger or smaller sheets of tissue. Get creative and happy crafting!

Reception Decor

Some of you may remember back in early September when I wrote about putting all these decorations together (check it out here), and it was really rewarding to finally see it all come together that day.


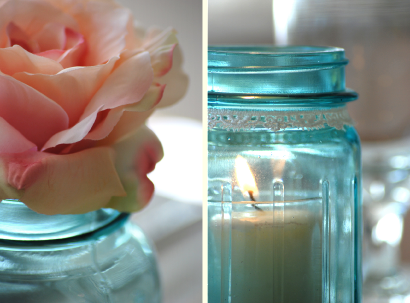
I wanted things to be clean, fresh and casual, and really reflect our style. I didn't want anything obtrusive on the tables that would make it hard to talk with the people across from you, so the simplicity of the bottles and single stem flowers really worked out well. Plus it was great to be able to put our vintage bottle and jar collection to good use!


Making the table runners was A LOT of work, but it wouldn't have been the same without them. I used five different fabrics and I loved the eclectic feel it gave.


Click here for a tutorial on how to make these napkin rings, which can be customized in so many ways!


MY CUSTOM CARD BOX


When it came time to find a card box, I was so excited to be able to turn to my good friend Rachel of Get Ready, Set, Go. I was lucky enough to hand pick this vintage train case from her collection while I was down visiting before the wedding and once I finished my invite art, I sent it her way to do up my case!


She hand drew the custom artwork to perfectly match my invitation (shown below) and even included our wedding date inside the top. I was thrilled to pieces with it and love that I now have an awesome, functional case that I can use anytime and is a great memory of our special day.


Stop back later today for the napkin ring tutorial and tomorrow for more about the cake buffet and candy bar with photos, craft projects and downloadable templates!