Wednesday, December 22, 2010

In the Kitchen: Glazed Lemon Cheesecake


If I could eat only one dessert for the rest of my life, anything involving peanut butter and chocolate would win hands down, but this cheesecake would be a close second. There's just something about lemon that I find irresistible no matter what the form.

This creamy, lemon-flavored cheesecake is topped with a homemade lemon curd glaze that is truly just too delicious for me to express, especially considering it requires only seven basic ingredients and is quick and easy to make.


Crust
2 1/4 cups honey graham cracker crumbs
1/4 cup sugar
2/3 cup butter, melted

Filling
3 8oz packages cream cheese, softened
1 1/4 cups sugar
3 eggs
4 Tablespoons fresh lemon juice*
1 heaping Tablespoon grated lemon peel
1 teaspoon pure vanilla extract

Glaze
2 eggs
1 cup sugar
1/4 cup fresh squeezed lemon juice
2 Tablespoons grated lemon peel
6 Tablespoons butter

*You will need a total of 3-4 medium to large lemons. Zest all the lemons before squeezing.

Combine the crust ingredients in a medium bowl and press onto the bottom and 2" up the sides of a 9" springform pan. Set the pan on a baking sheet and bake at 350° for 10 minutes. Let sit on a wire rack while you prepare the filling. Keep the oven at 350°.

For the filling, in a large bowl, beat cream cheese and sugar until smooth. Add eggs and beat on low until combined. Stir in the lemon juice, lemon peel and vanilla until just blended.

Pour slowly into crust, return pan to baking sheet and bake for 40 – 45 minutes or until edges are set and center is almost set. Cool on a wire rack for 10 minutes. Carefully run a knife around the edge of the pan to loosen the crust, cool for another hour then refrigerate overnight before serving.

For the glaze, in a small heavy saucepan, whisk the eggs, sugar, lemon juice and peel until blended. Add butter and cook, whisking constantly, until mixture thickens and coats the back of a spoon. Transfer to a small bowl and cool for 10 minutes. Cover and refrigerate until chilled.


Spread glaze on cheesecake before serving or serve it on the side with slices - yum! You will have about twice as much curd as you need to glaze the cheesecake but if you don't just eat it with a spoon (trust me, you will want to), it's delicious on toast, biscuits, scones, ice cream and sugar cookies!

This dessert is rich and decadent but still feels and tastes light and refreshing because of the lemon making it the perfect ending to a heavy holiday meal or a backyard BBQ on a hot summer day.


And find more easy and delicious recipes here.

Monday, December 20, 2010

Recap: The Holiday Goodwill Benefit


In looking back on the benefit, I hardly know where to begin. I guess the best place to start is by saying WOW! The event was a huge success. When I first heard about what was being planned, my worst fear was that no one would care and no one would come. Not that I didn't have faith in the amazing friends who were planning it, but it was all just so hard for me to process.

Despite the fact that we were hit with a notorious Cleveland blizzard that afternoon (which actually made national news), the turn out was still amazing with over 100 people attending. More than were at my wedding, funny enough! It was great seeing so many friends and family, of course, but it was the sea of unknown faces that touched me even more.


Being surrounded by so many people all at once who just wanted to help with no benefit to themselves was what really hit me the most. It's far too easy, regardless of your situation, to only notice the negative in life and in people. It's very easy to lose faith in humanity with all the horrible stories on the news, angry drivers, ornery holiday shoppers, etc. It was emotionally overwhelming to see all the faces who were there to support my family and also to see all the amazing donations that were made to the raffle and auction. Holy moly!


I received over 50 items from my online friends alone and several local businesses and individuals donated everything from gift baskets and signed sports paraphernalia to gift certificates, artwork and even a bicycle! My father works for the local grocery chain, Dave's Supermarkets, and they were extremely generous in their donations. All of the alcohol distributors they work with were also very kind so there was all sorts of fun items like coolers, vintage beer company wall decor, sweatshirts, a corn hole game and plenty of wine! A friend of my mom's from high school also donated two sailboat cruises that he and his wife charter in the Chesapeake Bay! It was just plain awesome, and people had a blast bidding on everything.


I was so busy running around, trying to talk to everyone and be the face of the family that I only had about five minutes to snap some photos. I think some other folks had cameras but I haven't had a chance to round them up yet, so I've included the few I was able to capture and may have more to share later. One of the local Embassy Suites donated use of the room and gave us the food at cost, which was delicious by the way! They even had a DJ who did an amazing job. The music was subtle at times and as the evening progressed he had people doing line dances, the YMCA and trains around the room! Considering I spend all my time caring for my dad or in the hospital these days, I can't even tell you how good it felt to be around so much happiness and fun.


I'm sure you are all asking the question right now, how much money was raised? The grand total nearly knocked me on my ass and of course, made my mother cry — over $11,000. Can you believe it? I still can't.

This will be a life saver for my family. My father has not been able to work in several months and while he still technically has his job, and insurance for now, he won't for long. My mother has been working as much as possible thanks to me being able to care for my Dad but she has not been able to work in a few weeks because my Dad has been in the hospital. While thankfully I can work from home, it's still hard for me to accomplish much any given day because of all the duties I have. Going on two years of doing this now, money has been getting pretty tight for all of us. Even with insurance, my Dad's medical bills are just plain ridiculous and his prescription medications are several hundred dollars a month.


This brings me to an update on my Dad. Up until three days before the benefit, we thought he may be able to attend, if even for a short time, but his pain became increasingly worse and some bad stomach issues forced us to admit him to the hospital where he still is now. Between me and my mom, we make sure someone is with him 24 hours a day. He is not in the ICU but needs so much assistance that the nurses don't really cover so we are always there to help him eat, go to the bathroom and decipher what the doctors are telling him. He is on so much medication that he is barely lucid most of the time.

Since him and my mom would not be able to attend the benefit, we organized a video chat between the benefit and the hospital. I brought my iMac to the event and sent the neighbors new Mac laptop to the hospital. My dad was tired and weak but we managed a virtual 'receiving line' in which guests were able to say hello to my parents and my parents were able to experience the event, sort of. I was thrilled to pieces that it actually worked out.


The biggest problem my Dad is facing right now is how quickly the cancer is spreading through his bones. He has a very bad tumor on his spine which has broken his rib and is starting to press on the cord. He also has a bad tumor on his pelvis near the where the spine connects and one in his right shoulder which is on the verge on causing a fracture. The spine tumors are of the most concern because of the pain they are causing, as well as preventing him from being able to move. They are having trouble finding the best way to control his pain right now which is why he has not left the hospital. Due to his immobility, he may need to go to a rehab facility or nursing home for some time while they try to get things under control — if they can. He is schedule for cyber knife radiation the first week in January which will hopefully shrink the tumors a bit and allow for some relief. We just continue to take it one day at a time, it's all we can do.

But enough about that, I think I need to wrap this up! I have no idea how I could ever adequately thank everyone who donated to the event and everyone who has supported me through this all, so for now I shall just continue to say THANK YOU! I can't get too sappy because when I start crying these days, I just can't stop. You will all be hearing from me personally as soon as I have a free moment and I do apologize that I've received some emails I have not answered yet. I'll be letting you all know how much your donation item raised, because that's just fun - right?

I'd love to end with a list of all the friends who donated, but I realized I should check with everyone to see if they want that to be public knowledge or not (and I hope the few pictured don't mind!), so I'll post a second follow up once I get that all together.

In closing, all I can say again, though it sounds so weak anymore, is thank you…

Tuesday, November 30, 2010

Lillyella's Secret Santa Gift Exchange!


The thing I love most about the holidays is giving gifts. I get so darn excited I can hardly contain myself! I haven't been involved with a secret santa gift exchange in quite some time, but after joining in on the one Team Etsy Project Embrace organized this year, I though it would be fun to organize one myself amongst blog friends! Most of you are total strangers but you do have one thing in common, you either like my jewelry or enjoy reading my blog. Good enough, right?!

So here's how it will work — From now until this Friday, I will collect the names and addresses of anyone who would like to participate. I will then randomly assign each participant the name of a person you are to send a gift to and you will receive a gift from someone else. Only myself and your secret santa will have your information and everything will be secret until gifts are received!

Gifts can be handmade or purchased, should be valued around $20 (before shipping) and gift wrapped. Please keep in mind you will also need to ship the item and I'll ask that items be shipped by December 17. (If you've never shipped anything internationally, don't be scared! It's easy, you just have to go to the post office and they will help you. It's not even necessarily more expensive, unless you are shipping something heavy.)


TO PARTICIPATE:
Please email your name and address to nicole@lillyella.com, subject: Secret Santa. Please also include whether or not you are willing to ship internationally. Feel free to include information about yourself — likes, dislikes, favorite colors, favorite Etsy shops, your personal style, hobbies, interests etc, or you can just leave it up to your secret santa to totally surprise you!

I will email you the name of your gift recipient, along with all the important details, by Monday, December 8.

Feel free to contact me anytime with any questions. I think this is going to be tons of fun, and maybe even a new tradition! Happy Holidays, everyone!

p.s. If you leave a comment on this post, please be sure to ALSO send me an email with all the info specified above. thanks!

photos © Anthropologie

Friday, November 19, 2010

In the Kitchen: Pumpkin Bread Pudding with Bourbon Caramel Sauce


Tired of traditional pumpkin pie or looking to shake things up this Thanksgiving? Then I have just the recipe for you. Best part is you could practically make it with your eyes closed, though I wouldn't necessarily recommend it. I'm just sayin', it's really easy! My mom described it as 'orgasmic', so I guess that means it's also pretty darn tasty, and I'll second that.

Ingredients
10 oz bread*
15 oz pumpkin puree (canned or fresh)
1 1/4 cup whole milk
1/2 cup heavy cream
2 large eggs
1/4 cup light brown sugar**
1/4 tsp salt
3/4 tsp pure vanilla extract
1 1/2 tsp cinnamon
1/2 tsp fresh grated nutmeg
1/4 tsp ground allspice
1/2 cup pecans, optional

Bourbon Caramel Sauce
3 cups whole milk
3/4 cup sugar
1/8 tsp salt
3/8 tsp baking soda
2 Tbsp Bourbon, optional


*When it comes to bread just about any will work and you want it to be a little stale, so whatever kind you use, let it sit out uncovered for about a day. I first tried this recipe with sourdough, then with whole wheat and italian, and all three were delicious. A brioche or french would also work nicely or you can get extra fancy by using croissants or cinnamon raisin bread.

You shouldn't need more than 10 oz of bread, maybe less depending on what kind and the shape you use, you'll just want to fill your pan nicely. You can either use 1/2" slices as shown on the left (quick and easy!) or you can cut or tear 1" cubes from an unsliced loaf and scatter them in your pan.

When you're ready to make the dish, preheat the oven to 350° and place the bread in a buttered 2qt baking dish.


To make the custard, whisk all the wet ingredients and spices together in a large bowl then pour the custard over the bread in the baking dish. Be sure to stir it around or lift the slices to spread it in between and under, making sure all the bread is thoroughly coated.

**If you're not planning on serving this dish with any kind of sweet sauce, I recommend doubling the light brown sugar in the custard to 1/2 cup total.


Next, toss the pecans in a bowl or plastic bag with 1 Tbsp brown sugar and 1/2 tsp cinnamon then spread them evenly over the pudding, if desired.

Bake until set, about 40 - 45 minutes. You'll need to cut into the middle to check the doneness as the top will set faster.

In the meantime you can make the sauce.


In a large saucepan, whisk together the milk, sugar and salt and heat to a simmer over medium heat.

When it begins to bubble, remove from heat and stir in the baking soda. It will foam up a bit.


Return to simmer and cook over medium heat, stirring occasionally and skimming off foam as needed. Sauce will begin to thicken and turn golden brown within 30 - 45 minutes.


Continue cooking until sauce is thick enough to lightly coat a spoon. When the sauce is almost finished, add the Bourbon if desired, and continue cooking until it reaches the desired consistency. If you're concerned about liking the flavor, start by adding one Tablespoon, then add the second if desired.


Serve scoops or slices of warm pudding topped with warm sauce and enjoy! The pudding and sauce can both be stored, covered, in the fridge for up to two weeks and you can definitely make this ahead of time for Thanksgiving dinner. Just reheat it in a low stove or microwave before serving and fill your gravy boat with the warm caramel sauce!


I'd love to hear what you think about this one and if it graces your dinner table this Thanksgiving.

p.s. It's also really good for breakfast!


And find more easy and delicious recipes here.

Wednesday, November 17, 2010

In the spirit of goodwill and favors


I'd like to start this post by saying "Here's where I call in a favor…", but the fact of the matter is, none of you owe me any favors. So I guess that brings us to goodwill.

As many of you know, the last year and a half has been challenging, to say the least, for my family. My father has been fighting a losing battle with cancer and my parents home has been robbed now three times. The company that my mom works for, which happens to be the same company I started my own career at, is organizing a small fundraising event to benefit my parents. While this is all kind of awkward for me, it's a supremely nice gesture on their part.

The event, named Holiday Goodwill, will take place on December 12 and will consist of a pasta dinner, chinese auction, ticket raffle and 50/50 raffle. A local hotel has donated use of their space and offered the food at cost. The event is still a secret to my parents (good thing mom is too busy to read my blog these days…) but I had to get involved to provide contacts and I also offered to help with some design.

Aside from that, the only other way I know to help is to humbly ask for auction and raffle donations, since I just happen to have this amazingly talented and artistic pool of friends! This is also awkward for me, because I know that everyone has their hardships and everyone is looking for a little goodwill these days. What makes this situation more worthy than another? The answer is nothing. I know that times are hard for everyone right now, regardless of your situation, so if I get absolutely no response to this I will completely understand.

If however, you would like to send along an item or even donate a service to be auctioned off at the event, I'd be forever indebted. Please email me, nicole@lillyella.com, with what you would like to donate and I'll reply with all the details.

My Dad and I, 1980

I'll now wrap this up with more specific details about my Dad's condition and where things currently stand. So many sweet friends ask for updates and I hardly find the time to post them. My father was diagnosed with Melanoma in March of 2009. What started as what he thought was a bug bite on his right leg quickly grew into a tumor the size of a baseball. By the time it was properly diagnosed, the surgery to remove it was very difficult with him losing a large chunk of his calf. We lovingly call it his sharkbite. His recovery was hard and I closed my shop at this time to be his daily caretaker.

Even though at the time of diagnosis, the cancer was level 5 (meaning it had spread to subcutaneous fat and tissue), they assured us it had not spread elsewhere. After surgery my Dad began the standard Interferon treatment regiment and was supposed to continue this for one year. It was hard on him and his body but after a few months we was able to return to work part time. At the beginning of this year, he had 6 more months of his regiment when another tumor popped up in his leg. This was followed days later by another and another. Within a week his leg was full new cancer growths.

The doctors continued to say the cancer had not spread past his leg and recommended we travel to Pittsburgh for a procedure called a limb profusion. They tourniquet the limb being treated and then flush it with extremely high doses of chemotherapy to try to kill the cancer. This saves the rest of the body from the side effects of chemo and also allows for a much stronger dose to be administered. So off to Pittsburgh we went. Dad spent a week in the ICU following the operation and my mom and I stayed in family housing nearby.

The recovery from this procedure was even harder than the first. My Dad's leg was basically useless and I once again returned to caring for him. After a few months and some physical therapy he was able to walk with a cane and eventually return to work again part time, though he was in constant pain.

A scan in early August revealed that the cancer had finally made it's way past his leg and spread throughout his body. It is in his bones, on his spine and on (but not in) his lung and some intestines. His leg was also once again full of tumors. Interleukin 2 (IL-2) was the next course of treatment. This is a very difficult procedure which requires a one week stay in the ICU followed by a week off then one more week in. It's extremely hard on many people with some very nasty side effects but Dad fought it like a champ. A follow up scan a few weeks later sadly showed no shrinkage of existing tumors and additional new growth.

We are now onto the next batch of treatments which include a couple rounds of chemo to try to shrink tumors and provide pain relief followed by a 12 week clinical trial. Unfortunately Dad is in a lot of pain due to the size and location of the tumors and also cannot use his leg again. He is no longer able to work and his employer has realized they cannot wait for him to return. This means he will also lose his health insurance, though even with it, many procedures and out of state travel are not covered.

I am caring for him daily again so that my mom can continue to work and am immensely lucky that I have the ability to, though over the past year and half it has taken a financial toll on me as well. I can still get some work done, but barely half what I would otherwise. Thus the reason I have yet to reopen my shop.

My parents home has also been robbed three times now since my Dad's diagnosis and because of this, and my Dad's condition, my parents will be moving into my house after Thanksgiving. This will certainly be an adjustment for everyone that will have its up and downs but at least I know they will be safe, have less financial burden and I can more easily care for my Dad.

What will the future hold? I haven't a clue. As hard as most days are, I haven't given up hope for my Dads recovery. I can't. And neither has he. We'll fight to the end and hopefully look back on this time and laugh… or something.

Update: The official site for the event is now up if you are local and would like to attend or if you would like to make a monetary donation: www.holidaygoodwill.com.

Tuesday, November 16, 2010

Breaking Through to the Other Side

It's been two years and seven months since I "quit my day job" to pursue my art full-time. As frightening as this was then, I've never once questioned my decision and I've never once looked back. I have enjoyed sharing the trials and tribulations of my adventure and hearing how it has inspired others to do the same, so when artist extraordinaire Greg Spalenka (partner in crime to the lovely Roxana Villa) asked me to be a part of his latest collaborative blogging project, I jumped at the opportunity.

The theme of today's event is Breaking Through to the Other Side, with myself and five others answering the question: What inspired you to create a career outside the confines of the corporate world?

Below is my story, and at the end of the post you'll find links to five other inspirational adventures.

Having chosen Graphic Design as my career path, I always felt lucky to have been able to turn a 'hobby' into a job. I truly loved it and still do today. So for me, deciding to break free from the corporate confines wasn't about not loving what I doing, but about not loving who I was doing it for. I'm sure both of those things ring true for almost everyone reading this. It's one thing to love your job and it's another to love your boss, co-workers and clients. It seems the two rarely meet.

When I quit my day job, I wasn't planning on a career change. I left to pursue graphic design on my own, as so many designers long for and plenty eventually do. I spent most of my 11-year professional career dreaming of the possibility, about 5 years half-assedly planning for it and the last 2 hard-core preparing for it. I had dreams and I had plans, but I spent the majority of my time being too scared to act on them. It's really easy to get comfortable, even if you're unhappy. The stability of a full-time job, a weekly paycheck and health insurance more than makes up for misery in many cases, especially the older we get.

I spent the last 3 years of my professional career in a very successful position with top name clients, great exposure and tons of flexibility. I also worked for a down-right rotten bitch. I know that's kind of horrible to say and I don't throw around insults lightly, but sometimes they are deserved. She made me miserable. I was emotionally and physically sick which in turn made me a down-right rotten bitch at times. Amazing how we let a job do that to us, isn't it?

I guess you could say those years eventually broke me, but this was a good a thing. As horrible as that time was, I wouldn't be where I am now without it. No matter how strong my desire was to break free and do my own thing, if I had been even just 1% more comfortable there then I was, I would have been 99% less likely to ever leave.

I used to ask myself, what's the worst that can happen? Not necessarily the best question because honestly, a lot can happen. You can fail, you can have no luck trying to return to the corporate world, you can go broke and lose everything. Worst case scenario, but a reality. Did I ever really think that would happen to me? No. I had tremendous faith in my motivation and resourcefulness. I also had a great background to stand on and a lot of talent (I can toot my own horn, right?). Still, it was terrifying.

Ultimately it came down to all the cliches — a leap of faith, trusting that life would find a way and believing that I was mentally and physically strong enough to do whatever I had to do to make it happen. I honestly believe not everyone is cut out to successfully work for themselves. You definitely need a certain personality, character and mindset, but it's amazing what strength you can muster up when you want something bad enough.

The details of everything following my decision to 'break free' could fill five blog posts (but you can read a little here), so I'll save the majority for another time and simply sum up the last two and half years of my life. Was leaving the corporate world the right decision for me? Without a doubt. If I had a dirtier mouth I'd even throw the f-word in there. Has it been easy? Of course not. I've never worked harder, and I think that's just a standard when you work for yourself, but I will say it has been easier than I may have guessed.

What can I attribute my success to? That I'm not entirely sure. The fact that I have multiple things I can do to make money may be the answer. Aside from the graphic design I first left to pursue, I have my jewelry (which many of you know quickly became my new full-time job rather than the design) and I also have photography. I can pick up jobs in any of those areas when I need to, giving me far more options and opportunities than if I just had one specialty. Over a decade of business experience and networking is definitely another answer. You have to know people and you have to be savvy. I believe a lot of that only comes with experience. Lastly I fall back on my strength and motivation. I never stop, I can't. There's no time to be lazy and there's no room to slack, though I will admit to napping occasionally :)

In closing I'll say that I'm certainly no motivational speaker. This is simply the story of someone who was fed up, took a chance, worked her ass off and got pretty lucky. I can only hope someone else will find inspiration in it. Now I'll get cheesy and spout more cliches — take a chance, you only live once and life is way too short. Happiness is a moral obligation, so make it happen for yourself.

xo ~ nicole

· · · · · · · · · · · · · · · · · · · · · · · · · · · · · · · · · · · · · · · · · · · · ·

For more inspirational stories of Breaking Through to the Other Side, follow these links:

Artist As Brand
Maria Brophy
Persist: The Blog
Miss Mindy
Working Artist Journal

Tuesday, October 26, 2010

Crafting: A Birds Nest Ring Pillow


Well, I'm finally getting around to posting the last of my DIY wedding projects. Only took me a little over a year — sheesh!

I will admit however, that what really lit the fire was the awesome DIY contest going on over on my favorite wedding blog, Ruffled. In addition to this project, I also submitted my previous tea bag tutorial and my tissue flower napkin rings, both of which you may remember seeing here. Up for the winning are three seriously awesome prizes so all my fingers are crossed that my craftiness pays off a little!


Anyways, back to the craft at hand. I created this nest 'pillow' for my wedding last September and was so pleased with how it came out. It was easy, quick and inexpensive and fit with my casual, natury decor perfectly.

Here's what you'll need:
Any size grapevine nest (I used 5")
Sheet moss
15" length of thin ribbon
Craft knife
Plastic eggs, silk flowers and feathers if desired


Most grapevine nests have some wire wrapping for stability, but if yours does not, loop a piece of wire up through the bottom and back down, flattening it on the bottom, to leave a small loop on the inside. You can even use a paperclip for this if you have no wire on hand.


Tuck one end of your ribbon through the loop inside the nest and set aside.

Cut a square of sheet moss larger than your nest, then trim into a circle that fits snugly into your nest.


Using a craft knife, cut a slit in the sheet moss and feed both ends of your ribbon up from the bottom.

Cover the back of the sheet moss with craft glue, pull the ribbon through until taut and press the moss into the nest.


At this point, if you'd like to add additional decorations, tie on your rings to gauge placement and then secure decorations such as plastic eggs, silk flowers and/or feathers with craft glue.


And voila! I told you it was easy :)

You can also attach a loop of thick ribbon or fabric to the bottom for a hand hold if desired and can easily customize the colors and decoration to match your specific decor.

Happy crafting!

Tuesday, October 12, 2010

In the Kitchen: Spicy Sweet Potato Chili


Do you know that sweet potatoes are a better choice nutritionally than white potatoes because they are lower in calories and higher in vitamins, nutrients and fiber? They leave you feeling fuller longer and are a good choice for diabetics as the high soluble fiber content helps lower blood sugar as opposed to white potatoes, a.k.a. blood sugar bombs.

If you've never been a fan of sweet potatoes, don't give up on them yet. Their expected taste is surprisingly transformed when cooked up with the other ingredients in this hearty autumn dish. Not a fan of the spice? You can leave out the jalapeno or substitute it with a mild poblano. You can also leave out the chicken and use vegetable stock to make this meal vegan friendly. You'll find a printable recipe card at the end of this post.


Ingredients
1 medium onion, chopped
2 medium red peppers, seeded and chopped
2 large cloves of garlic, minced
1 pound boneless, skinless chicken, chopped
15 oz cannellini beans*
1 cup chicken stock
2 cups cold water
3 large or 4 medium sweet potatoes, peeled and diced
2 teaspoons cumin
1 Tablespoon chili powder
pinch red pepper flakes
1 jalapeno, minced or 6 oz can diced green chilies

Optional garnish
scallions
sour cream
crumbled bacon
cheddar cheese

*You can use dried or canned beans for this dish. If using canned, drain and rinse them. If using dried, soak, rinse and cook them until partially tender before adding.

In a large pot, heat 1 Tablespoon olive oil over medium heat and saute the onion, red pepper and garlic until slightly tender.

Add the chicken and saute until opaque. Add the beans, stock, water, potatoes, jalapeno and spices. Bring the mixture to a boil then reduce the heat and simmer uncovered for about 30 minutes or until the potatoes are tender.

Couldn't get much easier!


I enjoy this dish topped with sour cream, fresh scallions, a little cheddar cheese and when I have it on hand, some crumbled bacon — all of which alone or together work really well with the flavor of the chili. Serve it up with some maple pecan muffins or whole wheat cornbread and you have a hearty dish that'll warm you up through the winter months ahead!


And find more easy and delicious recipes here.

Tuesday, September 28, 2010

In the Kitchen: Parmesan Mushroom Stuffed Peppers


This is my healthy, vegetarian spin on a classic crowd pleaser. Made with brown rice, fresh veggies and a little cheese, you've got just about all your food groups stuffed into one yummy little package, or should I say pepper. This dish is easy to make and can even be whipped up the night before and then popped into the oven to bake when you get home from work. You'll find a printable recipe card at the end of this post.

Ingredients serves 2
2 large bell peppers (any color, I use green and red)
3/4 cup cooked brown rice
2 large cloves garlic, minced
1/4 cup red onion, finely chopped
1 cup sliced fresh mushrooms
1/2 cup broccoli florets, chopped (fresh or thawed frozen work)
1/4 cup low sodium vegetable broth (can also use chicken)
1/4 tsp salt
1/4 tsp fresh ground pepper
2/3 cup salt free tomato sauce (just plain, not spaghetti sauce)
1/3 cup fresh parmesan cheese, grated, plus extra for topping


Preheat oven to 375°. Slice the tops off your peppers and clean out any seeds and membrane from inside. If desired, you can chop up the pepper top (discarding the stem) and add it to your stuffing mixture. Brush the outside of the peppers with a little olive oil and set aside.

Depending on what type of brown rice you are using, you'll want to cook this ahead of time. I use Minute brown rice, which is easy and works well, so I start cooking it when I start making the filling, as it only takes about 5 minutes.

To prepare the filling, saute the minced garlic and red onion with a little olive oil over medium high in a large skillet until tender. Add the mushrooms, broccoli and chopped pepper tops (if desired). Once the veggies are almost cooked through and soft, reduce the heat to medium, add the rice, chicken broth, salt and pepper and simmer until most of the broth cooks away and is absorbed into the mixture.

Remove from heat and stir in the tomato sauce and parmesan cheese until thoroughly mixed and melted. I recommend tasting the filling at this point before you stuff the peppers in case you want to add any additional salt or seasonings.

Spoon the filling into the peppers, stuffing them tightly. I cook mine in a glass loaf pan so if they want to tip over they don't have far to go, but any glass baking dish will do and you can always stabilize them with some foil around the bases.

Cover the dish with foil and bake for 40 - 45 minutes until the peppers start to get soft. I like my peppers slightly al dente, so to say, but you can cook them a bit longer if you'd like them really soft. Remove the foil and sprinkle a little shredded parmesan on the top of the peppers, return to the oven and bake or broil until melted. Serve and enjoy!


Don't like parmesan? Try cheddar. Don't like mushrooms or broccoli? This recipe is very versatile and you can substitute just about any veggies or cheese you wish. For a mexican spin, try using black beans and chopped roasted poblanos instead of the mushrooms and broccoli along with pepper jack cheese.

You can easily double this recipe to serve four or make it as is and stuff four small peppers instead of two. They also reheat well in the microwave or oven for a hearty lunch or second dinner. Enjoy!


And find more easy and delicious recipes here.

Tuesday, August 31, 2010

In the Kitchen: Vegetable Tofu Curry, Sweet or Savory


Yep, I said tofu again. But this time we're frying it up into crisp little cubes of yumminess then mixing it with a heaping helping of curry and a plethora of robust vegetables. This colorful concoction can be made sweet or savory by using apple juice or broth and makes a hearty main entree when served over brown rice, cous-cous or quinoa. Any leftovers make a perfect portable lunch as this dish tastes just as good at room temperature or reheated in the microwave.

Base Ingredients
14 oz firm tofu, 1" cubes pan fried
1 Tbsp canola oil
1 red onion, 1/2 dice
1 clove garlic, minced
2 cups cauliflower florets, 1" pieces
1 carrot, 1/2" slices
2 cups eggplant, 1" cubes
1 red bell pepper, 1" dice
1 sweet potato, 1/2" slices then quartered
1 small zucchini, 1/2" slices
1/2 cup raisins

Sweet Version
2 Tbsp curry powder
1/2 tsp cinnamon
2 cups unfiltered apple juice
1/2 tsp salt
fresh ground pepper

Savory Version
3 Tbsp curry powder
1/2 tsp turmeric
1/2 tsp cinnamon
2 cups low sodium chicken or vegetable broth
1 tsp salt
fresh ground pepper


The first step is to press, cube and pan fry the tofu. To press the tofu, halve the cake horizontally and set the two slabs on several layers of paper towels on a plate or cutting board. Top with additional paper towels and another plate or cutting board then weigh down with a heavy skillet or stock of books and let sit for about 20 minutes.

Once pressed, cut the tofu into 1" cubes.


Coat a large skillet with cooking spray and fry the tofu on medium high heat until crisp and browned on all sides, about 2 - 5 minutes per side. Set aside.


While the tofu is pressing and cooking you can prep the other ingredients. You'll start by cooking the onions and garlic, then add the cauliflower and carrots, so keep them separate. You can place the rest of the vegetables in a large bowl as you cut them, they will be added all at once.


Heat about one Tbsp of canola oil in a large pot or dutch oven. Add the garlic and red onion and saute until slightly softened.

Add the curry and cinnamon (and turmeric if making it savory) and cook until fragrant, about 1 minute. Add the liquid (apple juice or broth), the cauliflower and the carrots. Bring to a boil then reduce heat, cover and simmer for 10 minutes.

Next add the tofu, remaining vegetables, raisins, salt and pepper. Cover and simmer about 20 - 25 minutes, until the vegetables are tender but still hold their shape. Add additional seasonings to taste. You may find you like more salt than I call for, as I try to keep the salt fairly low in most of my dishes.


This dish is delicious served alone or atop a healthy grain like brown rice, cous cous or quinoa. Don't like tofu? Just leave it out or add some chicken. You can also adjust the vegetables to suit your tastes but I find this combination hearty and delicious any time of year. Enjoy!


And find more easy and delicious recipes here.

Tuesday, August 24, 2010

In the Kitchen: Chocolate Cupcakes with Peanut Butter Frosting


When asked what my favorite dessert is, I've never really had a definite answer - until I made these. See, me and peanut butter have this 'special' relationship that I just can't describe. I'm sure some of you understand. And my guess is you're either licking your computer screen right now or gagging at the thought of it, because peanut butter kinda seems like one of those things you either love or hate.

Understanding that everyone's tastes are different, I'll simply say it's my opinion that you won't find a more perfect chocolate cake or peanut butter frosting than this. Don't love peanut butter? Don't worry — these cupcakes are the perfect base for topping with anything your heart desires. Insanely moist, dark and rich, no one will ever know they are made with whole wheat flour and are low in sugar compared to many. Don't worry, I won't tell your other recipes you have a new favorite.

Ingredients
6 Tablespoons unsalted butter, room temp
1/3 cup sugar*
1/3 cup brown sugar, packed
2 large eggs, room temp
1 tsp pure vanilla extract
1/2 cup plus 1 Tablespoon buttermilk, room temp
1/4 cup sour cream, room temp
1/2 cup plus 6 Tbsp whole wheat pastry flour
1/4 cup cocoa powder
1/4 cup dutch process cocoa powder
3/4 teaspoon baking soda
1/4 teaspoon salt

Frosting
1 cup powdered sugar
1 cup creamy natural peanut butter
5 Tablespoons unsalted butter, room temp
1/2 teaspoon pure vanilla extract
1/8 teaspoon salt
1/3 cup heavy cream

*If you find you like a sweeter cupcake, increase the sugar to 1/2 cup. Sweeter still? Also increase the brown sugar to 1/2 cup.

Preheat the oven to 350° and line a 12 tin muffin pan with paper liners or grease and lightly flour cups.


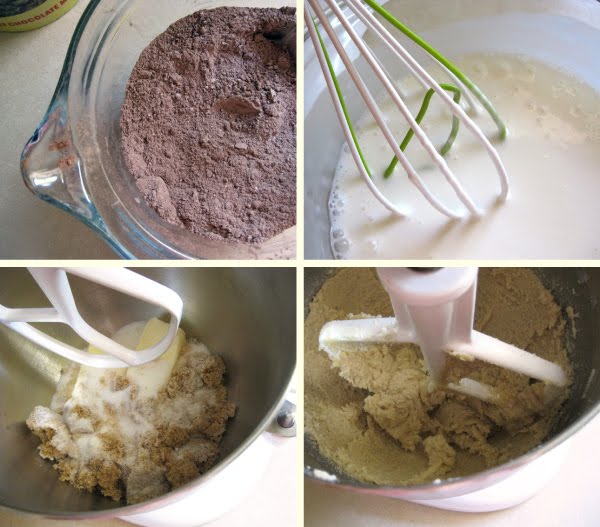
In a medium bowl, sift together the flour, cocoa powders, baking soda and salt. Set aside. In another bowl or measuring cup, whisk together the buttermilk and sour cream, set aside.

With an electric mixer (hand or stand) in a large bowl, cream together the butter and sugars until light and slightly fluffy. Add the eggs, one at a time, followed by the vanilla and mix until well blended.


Next add the buttermilk and the flour mixtures, alternating one third of each at a time starting with the buttermilk and ending with the flour, beating on low speed. Mix just until blended.

Divide the batter evenly among 12 prepared cups and bake at 325° for 17 - 20 minutes until a toothpick inserted in the center comes out mostly clean. Cool for about 15 minutes in the pan then transfer to a wire rack and cool completely before frosting.


To make the frosting, place all ingredients in a large bowl and beat first on low speed, then on medium high until smooth and creamy. Scrape down the sides of the bowl as needed.

Do note that I use natural peanut butter for this recipe, meaning nothing in the jar but peanuts. No sugar, no salt, no additives of any kind. You certainly can use a brand like Jif but it will make a much sweeter and intense frosting, and I don't recommend it.


I use a pastry bag to pipe on the frosting, and if you do so, you can chill the frosting in the fridge a bit to make it easier to work with. Alternatively, you can simply spread it on with a butter or frosting knife right after making it. Just be sure your cupcakes are completely cooled or the frosting will melt right off.

If you use a pastry bag, I do recommend using a disposable one. After all, it is peanut butter, so you can imagine how fun the cleanup is :)


If you wanna go all out, top these babies with some mini chocolate chips or chocolate shavings after frosting. If you aren't serving these right away or if you have any leftovers (fat chance), store them in an airtight container the fridge but allow them to warm back to room temperature before serving.

So now that I've hyped these up so much, I hope you aren't let down, and I'd love to hear what you think. Enjoy!


And find more easy and delicious recipes here.